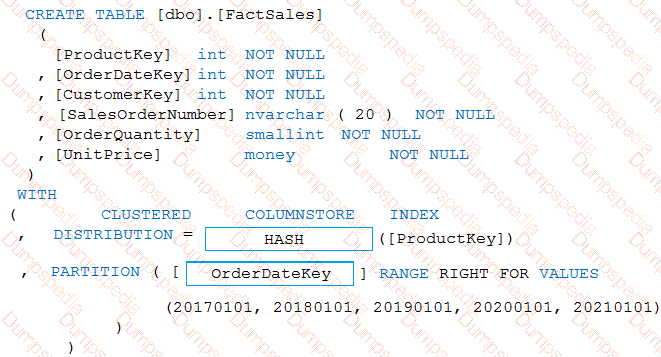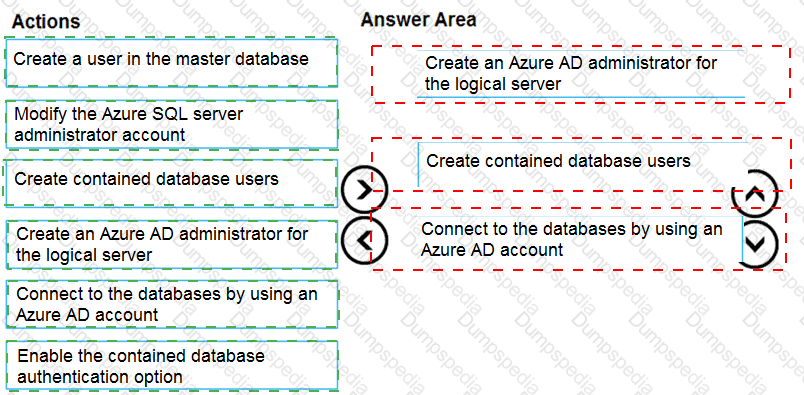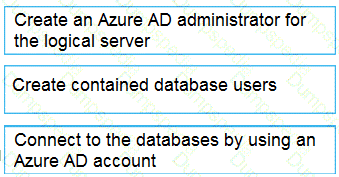
You plan to create a table in an Azure Synapse Analytics dedicated SQL pool.
Data in the table will be retained for five years. Once a year, data that is older than five years will be deleted.
You need to ensure that the data is distributed evenly across partitions. The solutions must minimize the amount of time required to delete old data.
How should you complete the Transact-SQL statement? To answer, drag the appropriate values to the correct targets. Each value may be used once, more than once, or not at all.
You may need to drag the split bar between panes or scroll to view content.
NOTE: Each correct selection is worth one point.
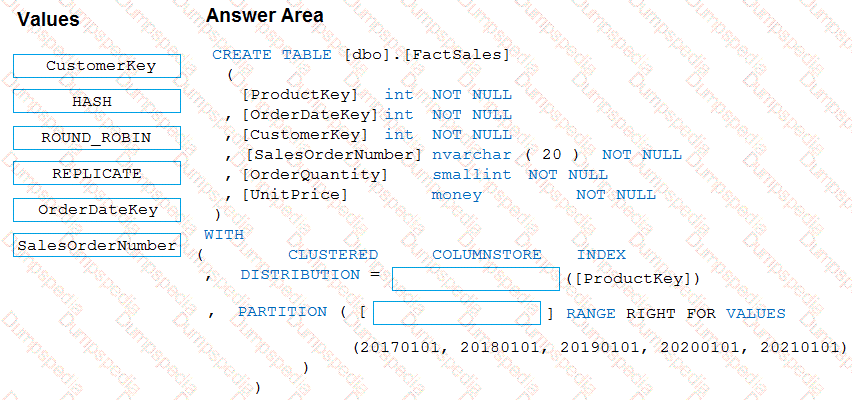


Box 1: HASH
Box 2: OrderDateKey
In most cases, table partitions are created on a date column.
A way to eliminate rollbacks is to use Metadata Only operations like partition switching for data management. For example, rather than execute a DELETE statement to delete all rows in a table where the order_date was in October of 2001, you could partition your data early. Then you can switch out the partition with data for an empty partition from another table.
You have an on-premises Microsoft SQL Server 2022 instance named SQL1. You have an Azure subscription that contains an Azure SQL managed instance named SQLM11 You need to configure a bidirectional disaster recovery solution between SQL1 and SQLMI1. What should you include in the solution?
Log Replay Service (LRS)
the Managed Instance link
Azure Database Migration Service
a failover group
Basic Concept: This question tests choosing the correct Azure migration approach by matching the source platform, target service, downtime tolerance, and administrative effort.
Why B is Correct: the Managed Instance link is part of the availability or recovery design space, but the correct choice must satisfy the specified failover, restore, quorum, RPO, or RTO requirement. In this scenario, the important constraint is: You have an Azure subscription that contains an Azure SQL managed instance named SQLM11 You need to configure a bidirectional disaster recovery solution between SQL1 and SQLMI1. the Managed Instance link satisfies that constraint without adding an unrelated service or manual process.
Why A is Wrong: Log Replay Service replays full, differential, and transaction log backups into Azure SQL Managed Instance, making it appropriate for low-downtime migrations from SQL Server. It handles a different resilience pattern and would not deliver the failover or recovery behavior required here.
Why C is Wrong: Azure Database Migration Service is the managed migration service used to move database engines to Azure targets with online or offline migration modes depending on source and target support. It does not meet the failover, restore, quorum, or cross-region continuity target stated in the question, even if it is valid in a different availability design.
Why D is Wrong: Auto-failover groups provide managed geo-replication and listener-based failover for Azure SQL Database or Managed Instance, including automatic failover policies for regional outages. It handles a different resilience pattern and would not deliver the failover or recovery behavior required here.
You create five Azure SQL Database instances on the same logical server.
In each database, you create a user for an Azure Active Directory (Azure AD) user named User1.
User1 attempts to connect to the logical server by using Azure Data Studio and receives a login error.
You need to ensure that when User1 connects to the logical server by using Azure Data Studio, User1 can see all the databases.
What should you do?
Create User1 in the master database.
Assign User1 the db_datareader role for the master database.
Assign User1 the db_datareader role for the databases that Userl creates.
Grant select on sys.databases to public in the master database.
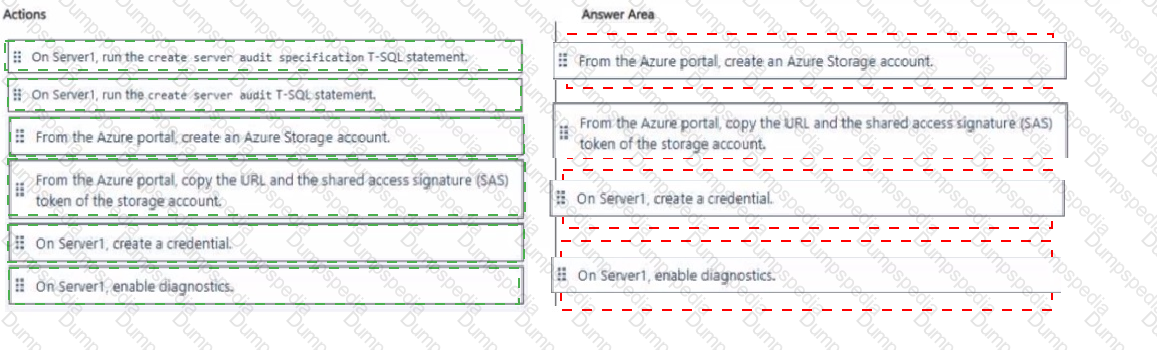
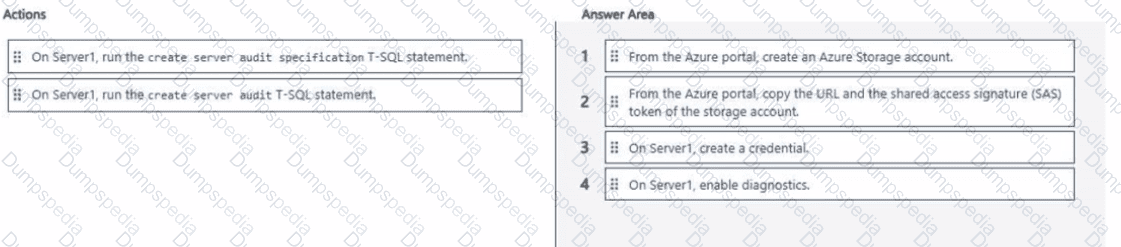
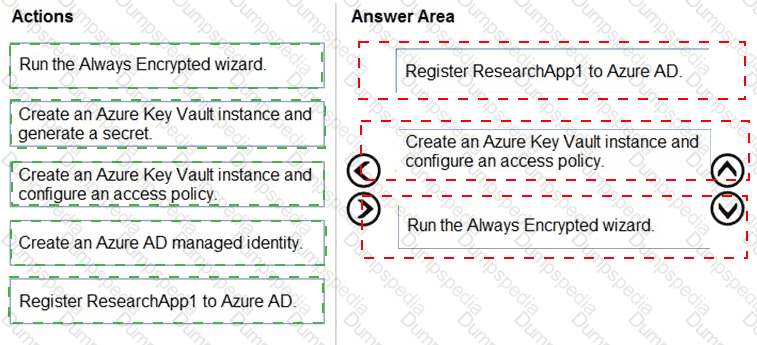
You have an Azure subscription that contains an Azure SQL managed instance named Server1.
You need to enable auditing for Server 1. The solution must minimize administrative effort.
Which four actions should you perform in sequence? To answer, move the appropriate actions from the list of actions to the answer area and arrange them m the correct order.



Basic Concept: This question tests database auditing and query visibility. DP-300 expects you to distinguish between collecting audit events, retaining logs, and analyzing query behavior.
Why the selected answer is Correct: The selected values fit this scenario because they apply the required Azure SQL configuration at the correct scope and sequence: You need to enable auditing for Server 1.
Why the alternate choices are Wrong: The alternate selections apply to different administrative stages or different scopes. In a hotspot or drag-drop task, order and scope are part of the answer, so a technically valid Azure feature can still be wrong if it is placed in the wrong step.
You have an Azure subscription that contains a group named Group1 and an Azure SQL managed instance that hosts a database named 081. You need to ensure that Group 1 has read access to new tables created m 06I The solution must use the principle of least privilege How should you complete the Transact-SQL statement ' To answer, select the appropriate options in the answer area. NOTE: Each correct selection is worth one point.



Basic Concept: This question tests plan and implement data platform resources in the DP-300 exam context. The correct choice is determined by the exact service boundary and operational requirement stated in the scenario.
Why the selected answer is Correct: The selected values fit this scenario because they apply the required Azure SQL configuration at the correct scope and sequence: You need to ensure that Group 1 has read access to new tables created m 06I The solution must use the principle of least privilege How should you complete the Transact-SQL statement ' To answer, select the appropriate options in the answer area.
Why the alternate choices are Wrong: The alternate selections apply to different administrative stages or different scopes. In a hotspot or drag-drop task, order and scope are part of the answer, so a technically valid Azure feature can still be wrong if it is placed in the wrong step.
You have an Azure subscription that contains 50 instances of SQL Server on Azure Virtual Machines. The instances host 500 Azure SQL databases. You need to ensure that all the databases have the same configuration. The solution must meet the following requirements:
• Auditing must be enabled.
• Azure Defender must be enabled.
• Public network access must be disabled.
• Administrative effort must be minimized.
Which two resources should you create in the subscription? Each correct answer presents part of the solution. NOTE: Each correct selection is worth one point.
an Azure Policy assignment
an Azure Automation account
an Azure Policy initiative
an Azure Automation runbook
an Azure Policy definition
Basic Concept: This question tests database auditing and query visibility. DP-300 expects you to distinguish between collecting audit events, retaining logs, and analyzing query behavior.
Why C and E is Correct: an Azure Policy initiative is correct because it is the feature whose normal purpose matches the stated requirement. an Azure Policy initiative can participate in administration workflows, but automation questions require the mechanism that can execute repeatable tasks with the correct scope and schedule. The scenario wording points to that specific behavior: You need to ensure that all the databases have the same configuration. an Azure Policy definition is correct because it is the feature whose normal purpose matches the stated requirement. an Azure Policy definition can participate in administration workflows, but automation questions require the mechanism that can execute repeatable tasks with the correct scope and schedule. The scenario wording points to that specific behavior: You need to ensure that all the databases have the same configuration.
Why A is Wrong: an Azure Policy assignment can participate in administration workflows, but automation questions require the mechanism that can execute repeatable tasks with the correct scope and schedule. It does not provide the required repeatable execution, scheduling, or deployment automation requirement, so it would not complete the administrative workflow reliably.
Why B is Wrong: Azure Automation runbooks execute PowerShell or Python tasks on a schedule, making them useful for Azure SQL maintenance workflows. It belongs to a different step of operations; this question needs the mechanism that can run or deploy the task repeatedly.
Why D is Wrong: Azure Automation runbooks execute PowerShell or Python tasks on a schedule, making them useful for Azure SQL maintenance workflows. It does not provide the required repeatable execution, scheduling, or deployment automation requirement, so it would not complete the administrative workflow reliably.
Task 1
In an Azure SQL database named db1, you need to enable page compression on the PK_SalesOrderHeader_SalesOrderlD clustered index of the SalesLT.SalesOrderHeader table.
See the explanation part for the complete Solution.
To enable page compression on the PK_SalesOrderHeader_SalesOrderlD clustered index of the SalesLT.SalesOrderHeader table in db1, you can use the following Transact-SQL script:
-- Connect to the Azure SQL database named db1
USE db1;
GO
-- Enable page compression on the clustered index
ALTER INDEX PK_SalesOrderHeader_SalesOrderlD ON SalesLT.SalesOrderHeader
REBUILD WITH (DATA_COMPRESSION = PAGE);
GO
This script will rebuild the clustered index with page compression, which can reduce the storage space and improve the query performance
The script solution consists of three parts:
The first part is USE db1; GO. This part connects to the Azure SQL database named db1, where the SalesLT.SalesOrderHeader table is located. The GO command separates the batches of Transact-SQL statements and sends them to the server.
The second part is ALTER INDEX PK_SalesOrderHeader_SalesOrderlD ON SalesLT.SalesOrderHeader REBUILD WITH (DATA_COMPRESSION = PAGE); GO. This part enables page compression on the clustered index named PK_SalesOrderHeader_SalesOrderlD, which is defined on the SalesLT.SalesOrderHeader table. The ALTER INDEX statement modifies the properties of an existing index. The REBUILD option rebuilds the index from scratch, which is required to change the compression setting. The DATA_COMPRESSION = PAGE option specifies that page compression is applied to the index, which means that both row and prefix compression are used. Page compression can reduce the storage space and improve the query performance by compressing the data at the page level. The GO command ends the batch of statements.
The third part is optional, but it can be useful to verify the compression status of the index. It is SELECT name, index_id, data_compression_desc FROM sys.indexes WHERE object_id = OBJECT_ID( ' SalesLT.SalesOrderHeader ' );. This part queries the sys.indexes catalog view, which contains information about the indexes in the database. The SELECT statement returns the name, index_id, and data_compression_desc columns for the indexes that belong to the SalesLT.SalesOrderHeader table. The OBJECT_ID function returns the object identification number for the table name. The data_compression_desc column shows the compression type of the index, which should be PAGE for the clustered index after the script is executed.
These are the steps of the script solution for enabling page compression on the clustered index of the SalesLT.SalesOrderHeader table in db1.
Task 1
You need to implement a disaster recovery solution by using active geo replication for an Azure Azure SQL database named db1. The replica must be in the East US or East US 2 Azure region on a server named sql60152867-dr.database.windows.net. You may need to use SQL Server Management Studio and the Azure portal.
See the explanation part for the complete Solution.
Requirement: Configure active geo-replication for Azure SQL Database db1. The geo-replica must be created in East US or East US 2 on the logical Azure SQL server:
sql60152867-dr.database.windows.net
The important point: in Azure SQL, the logical server name used in portal/T-SQL is usually:
sql60152867-dr
not the full FQDN.
Microsoft states that active geo-replication is configured per database, and a geo-secondary is created for an existing Azure SQL Database. After creation and seeding, changes from the primary are replicated asynchronously to the secondary.
Method 1 — Azure Portal Method
This is the safest method for the simulation if the portal is available.
Step 1: Open the primary database
Sign in to the Azure portal.
Search for SQL databases.
Select the database named db1.
Confirm you are looking at the primary database, not an existing secondary.
Step 2: Open the Replicas blade
In the left menu of the db1 database page, scroll to Data management.
Select Replicas.
Select Create replica.
Microsoft’s portal workflow is: open the database, go to Data management > Replicas, and choose Create replica.
Step 3: Configure the geo-secondary replica
On the Create SQL Database replica page, configure the target like this:
Setting
Value
Database
db1
Replica type
Geo replica / Active geo-replication
Target server
sql60152867-dr
Region
East US or East US 2
Database name
db1
Compute + storage
Keep same or compatible with primary
Elastic pool
Only choose this if the lab specifically requires an elastic pool
Do not create a failover group unless the task asks for one. This task says active geo replication, so configure a database-level geo-replica, not a failover group. Microsoft explicitly separates active geo-replication from failover groups and notes that active geo-replication is configured per database.
Step 4: Review and create
Select Review + create.
Confirm the target server is:
sql60152867-dr
Confirm the region is either:
East US
or
East US 2
Select Create.
Azure will create the secondary database and begin the seeding process. Microsoft notes that the secondary database has the same name as the primary by default and begins replication after it is created and seeded.
Step 5: Verify replication
After deployment completes:
Go back to the primary database db1.
Open Replicas again.
Under Geo replicas, confirm that a replica exists on:
sql60152867-dr.database.windows.net
Confirm the replica status is healthy, online, or synchronizing.
You can also open the target SQL server sql60152867-dr and verify that a database named db1 now exists there.
Method 2 — SSMS / T-SQL Method
Use this method if the portal is awkward or the exam simulation expects T-SQL.
Step 1: Allow SSMS connectivity
Before connecting with SSMS:
In Azure portal, open the primary SQL server hosting db1.
Go to Networking or Firewalls and virtual networks.
Add your client IP address.
Repeat this on the secondary server:
sql60152867-dr.database.windows.net
This matters because SSMS must be able to connect to the Azure SQL logical server.
Step 2: Connect to the primary server in SSMS
Open SQL Server Management Studio.
Connect to the primary Azure SQL logical server that hosts db1.
Use SQL admin credentials or Microsoft Entra admin credentials.
In Connection Properties, connect to the database:
master
This is important. For Azure SQL Database geo-replication setup through T-SQL, run the command from the master database on the primary server.
Step 3: Run the active geo-replication command
Run this query:
ALTER DATABASE [db1]
ADD SECONDARY ON SERVER [sql60152867-dr]
WITH (ALLOW_CONNECTIONS = ALL);
Microsoft documents that ALTER DATABASE ... ADD SECONDARY ON SERVER creates a secondary database for an existing Azure SQL Database and starts data replication. The official example also uses WITH (ALLOW_CONNECTIONS = ALL) to create a readable geo-secondary.
Step 4: Verify the replication link
Still connected to the primary server, run:
SELECT *
FROM sys.geo_replication_links;
Or use:
SELECT *
FROM sys.dm_geo_replication_link_status;
Microsoft lists sys.geo_replication_links and sys.dm_geo_replication_link_status as views used to return information about existing replication links and replication status.
Optional PowerShell Method
Only use this if the lab gives you Cloud Shell or PowerShell access.
New-AzSqlDatabaseSecondary `
-ResourceGroupName " < PrimaryResourceGroupName > " `
-ServerName " < PrimaryServerName > " `
-DatabaseName " db1 " `
-PartnerResourceGroupName " < SecondaryResourceGroupName > " `
-PartnerServerName " sql60152867-dr " `
-PartnerDatabaseName " db1 "
Microsoft identifies New-AzSqlDatabaseSecondary as the PowerShell cmdlet that creates a secondary database for an existing Azure SQL Database and starts replication.
Final Answer / What You Must Achieve
The task is complete when:
Database db1 still exists on the primary server.
A secondary database named db1 exists on:
sql60152867-dr.database.windows.net
The target server is in East US or East US 2.
The replica appears under db1 > Replicas > Geo replicas.
Replication status is healthy, online, seeding, or synchronizing.
You did not configure a failover group unless separately requested.
Task 6
You need to ensure that any enhancements made to the Query Optimizer through patches are available to dbl and db2 on sql37006895.
See the explanation part for the complete Solution.
To ensure that any enhancements made to the Query Optimizer through patches are available to dbl and db2 on sql37006895, you need to enable the query optimizer hotfixes option for each database. This option allows you to use the latest query optimization improvements that are not enabled by default1. You can enable this option by using the ALTER DATABASE SCOPED CONFIGURATION statement2.
Here are the steps to enable the query optimizer hotfixes option for dbl and db2 on sql37006895:
Connect to sql37006895 using SQL Server Management Studio, Azure Data Studio, or any other tool that supports Transact-SQL statements.
Open a new query window and run the following commands for each database:
-- Switch to the database context
USE dbl;
GO
-- Enable the query optimizer hotfixes option
ALTER DATABASE SCOPED CONFIGURATION SET QUERY_OPTIMIZER_HOTFIXES = ON;
GO
Repeat the same commands for db2, replacing dbl with db2 in the USE statement.
To verify that the query optimizer hotfixes option is enabled for each database, you can query the sys.database_scoped_configurations catalog view. The value of the query_optimizer_hotfixes column should be 1 for both databases.
These are the steps to enable the query optimizer hotfixes option for dbl and db2 on sql37006895.
Task 3
You need to ensure that all queries executed against dbl are captured in the Query Store.
See the explanation part for the complete Solution.
To ensure that all queries executed against dbl are captured in the Query Store, you need to enable the Query Store feature for the database and set the query capture mode to ALL. The Query Store feature provides you with insight on query plan choice and performance for Azure SQL Database1. The query capture mode controls whether all queries or only a subset of queries are tracked2.
Here are the steps to enable the Query Store and set the query capture mode to ALL for the database dbl:
Using the Azure portal:
Go to the Azure portal and select your Azure SQL Database server.
Select the database dbl and click on Query Performance Insight in the left menu.
Click on Configure Query Store and turn on the Query Store switch.
In the Query Capture Mode dropdown, select All and click on Save.
Using Transact-SQL statements:
Connect to the Azure SQL Database server and the database dbl using SQL Server Management Studio or Azure Data Studio.
Run the following command to enable the Query Store for the database: ALTER DATABASE dbl SET QUERY_STORE = ON;
Run the following command to set the query capture mode to ALL for the database: ALTER DATABASE dbl SET QUERY_STORE (QUERY_CAPTURE_MODE = ALL);
These are the steps to ensure that all queries executed against dbl are captured in the Query Store.
Task 8
You plan to perform performance testing of db1.
You need prevent db1 from reverting to the last known good query plan.
See the explanation part for the complete Solution.
To prevent db1 from reverting to the last known good query plan, you need to disable the automatic plan correction feature for the database. This feature is enabled by default and allows the Query Store to detect and fix plan performance regressions by forcing the last good plan1. However, if you want to test the performance of different plans without interference from the Query Store, you can turn off this feature by using the ALTER DATABASE SCOPED CONFIGURATION statement2.
Here are the steps to disable the automatic plan correction feature for db1:
Connect to db1 using SQL Server Management Studio, Azure Data Studio, or any other tool that supports Transact-SQL statements.
Open a new query window and run the following command: ALTER DATABASE SCOPED CONFIGURATION SET AUTOMATIC_TUNING (FORCE_LAST_GOOD_PLAN = OFF); GO
This command will disable the automatic plan correction feature for db1 and allow the Query Optimizer to choose the best plan based on the current statistics and parameters3.
To verify that the automatic plan correction feature is disabled for db1, you can query the sys.database_scoped_configurations catalog view. The value of the force_last_good_plan column should be 0 for db1.
These are the steps to disable the automatic plan correction feature for db1.
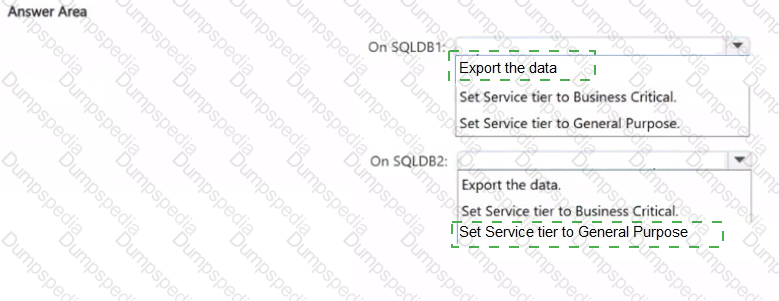
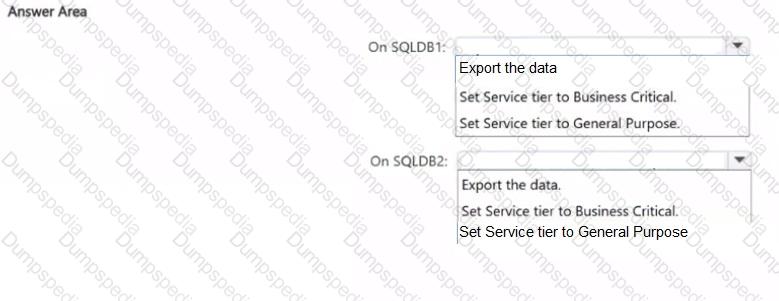
You have two Azure SQL databases named SQLDB1 and SQLDB2 in the Hyperscale service tier. SQLDB1 was set to the Hyperscale service tier when the database was created. SQLDB2 was changed from the Business Critical service tier to the Hyperscale service tier during the last 14 days.
You need to change SQLDB1 and SQLDB2 to the Business Critical service tier. The solution must minimize the administrative effort.
What should you do first? To answer, select the appropriate options in the answer area.
NOTE: Each correct selection is worth one point.


Basic Concept: This question tests plan and implement data platform resources in the DP-300 exam context. The correct choice is determined by the exact service boundary and operational requirement stated in the scenario.
Why the selected answer is Correct: The selected values fit this scenario because they apply the required Azure SQL configuration at the correct scope and sequence: You need to change SQLDB1 and SQLDB2 to the Business Critical service tier.
Why the alternate choices are Wrong: The alternate selections apply to different administrative stages or different scopes. In a hotspot or drag-drop task, order and scope are part of the answer, so a technically valid Azure feature can still be wrong if it is placed in the wrong step.
Note: This question is part of a series of questions that present the same scenario. Each question in the series contains a unique solution that might meet the stated goals. Some question sets might have more than one correct solution, while others might not have a correct solution.
After you answer a question in this section, you will NOT be able to return to it. As a result, these questions will not appear in the review screen.
You have an Azure Data Lake Storage account that contains a staging zone.
You need to design a daily process to ingest incremental data from the staging zone, transform the data by executing an R script, and then insert the transformed data into a data warehouse in Azure Synapse Analytics.
Solution: You schedule an Azure Databricks job that executes an R notebook, and then inserts the data into the data warehouse.
Does this meet the goal?
Yes
No
Must use an Azure Data Factory, not an Azure Databricks job.
You are designing a security model for an Azure Synapse Analytics dedicated SQL pool that will support multiple companies.
You need to ensure that users from each company can view only the data of their respective company.
Which two objects should you include in the solution? Each correct answer presents part of the solution.
NOTE: Each correct selection is worth one point.
a column encryption key
asymmetric keys
a function
a custom role-based access control (RBAC) role
a security policy
Azure RBAC is used to manage who can create, update, or delete the Synapse workspace and its SQL pools, Apache Spark pools, and Integration runtimes.
Define and implement network security configurations for resources related to your dedicated SQL pool with Azure Policy.
You need to recommend which configuration to perform twice to enable access to the primary and secondary replicas of DB3. The solution must meet the availability requirements.
What should you recommend?
Configure virtual network service endpoints.
Enable database firewall rules.
Create database-scoped credentials.
Configure connection strings that reference the read-write listener.
Basic Concept: This question tests high availability and disaster recovery design for Azure SQL, SQL Server on Azure VMs, and regional failure scenarios.
Why D is Correct: Configure connection strings that reference the read-write listener. is correct because it is the feature whose normal purpose matches the stated requirement. Configure connection strings that reference the read-write listener. is part of the availability or recovery design space, but the correct choice must satisfy the specified failover, restore, quorum, RPO, or RTO requirement. The scenario wording points to that specific behavior: You need to recommend which configuration to perform twice to enable access to the primary and secondary replicas of DB3.
Why A is Wrong: A service endpoint secures traffic to an Azure service over the Azure backbone but still targets the service public endpoint rather than giving it a private IP in the VNet. It is not wrong technology in general, but it is the wrong HA/DR control for this scenario ' s failure model.
Why B is Wrong: Database-level firewall rules restrict access to a specific Azure SQL database and are more granular than server-level firewall rules. It does not meet the failover, restore, quorum, or cross-region continuity target stated in the question, even if it is valid in a different availability design.
Why C is Wrong: Create database-scoped credentials. is part of the availability or recovery design space, but the correct choice must satisfy the specified failover, restore, quorum, RPO, or RTO requirement. It handles a different resilience pattern and would not deliver the failover or recovery behavior required here.
You have an Azure subscription. The subscription contains an instance of SQL Server on Azure Virtual Machines named SQL1 and an Azure Automation account named account1. You need to configure account1 to restart the SQL Server Agent service if the service stops. Which setting should you configure?
Start/Stop VM
Update management
State configuration (DSC)
Change tracking
Basic Concept: This question tests task automation for database administration, including which Azure or SQL mechanism can run repeatable maintenance and configuration work.
Why C is Correct: State configuration (DSC) can participate in administration workflows, but automation questions require the mechanism that can execute repeatable tasks with the correct scope and schedule. This fits the case because the requested outcome is: You need to configure account1 to restart the SQL Server Agent service if the service stops. The selected feature addresses that outcome directly rather than relying on a workaround.
Why A is Wrong: Start/Stop VM can participate in administration workflows, but automation questions require the mechanism that can execute repeatable tasks with the correct scope and schedule. It belongs to a different step of operations; this question needs the mechanism that can run or deploy the task repeatedly.
Why B is Wrong: Update management can participate in administration workflows, but automation questions require the mechanism that can execute repeatable tasks with the correct scope and schedule. It would leave too much manual work or would operate at the wrong scope for the requested automation.
Why D is Wrong: Change tracking can participate in administration workflows, but automation questions require the mechanism that can execute repeatable tasks with the correct scope and schedule. It belongs to a different step of operations; this question needs the mechanism that can run or deploy the task repeatedly.
What should you use to migrate the PostgreSQL database?
Azure Data Box
AzCopy
Azure Database Migration Service
Azure Site Recovery
Which audit log destination should you use to meet the monitoring requirements?
Azure Storage
Azure Event Hubs
Azure Log Analytics
Scenario: Use a single dashboard to review security and audit data for all the PaaS databases.
With dashboards can bring together operational data that is most important to IT across all your Azure resources, including telemetry from Azure Log Analytics.
Note: Auditing for Azure SQL Database and Azure Synapse Analytics tracks database events and writes them to an audit log in your Azure storage account, Log Analytics workspace, or Event Hubs.
What should you implement to meet the disaster recovery requirements for the PaaS solution?
Availability Zones
failover groups
Always On availability groups
geo-replication
Scenario: In the event of an Azure regional outage, ensure that the customers can access the PaaS solution with minimal downtime. The solution must provide automatic failover.
The auto-failover groups feature allows you to manage the replication and failover of a group of databases on a server or all databases in a managed instance to another region. It is a declarative abstraction on top of the existing active geo-replication feature, designed to simplify deployment and management of geo-replicated databases at scale. You can initiate failover manually or you can delegate it to the Azure service based on a user-defined policy.
The latter option allows you to automatically recover multiple related databases in a secondary region after a catastrophic failure or other unplanned event that results in full or partial loss of the SQL Database or SQL Managed Instance availability in the primary region.
Based on the PaaS prototype, which Azure SQL Database compute tier should you use?
Business Critical 4-vCore
Hyperscale
General Purpose v-vCore
Serverless
There are CPU and Data I/O spikes for the PaaS prototype. Business Critical 4-vCore is needed.
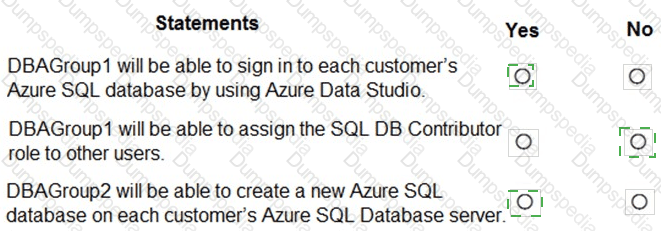
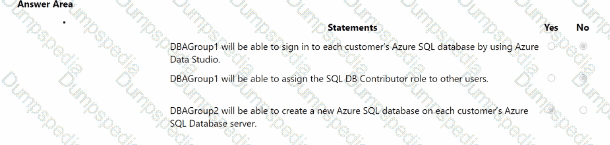
You are evaluating the role assignments.
For each of the following statements, select Yes if the statement is true. Otherwise, select No.
NOTE: Each correct selection is worth one point.
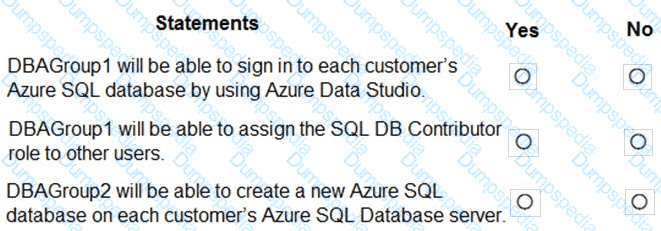


Box 1: Yes
DBAGroup1 is member of the Contributor role.
The Contributor role grants full access to manage all resources, but does not allow you to assign roles in Azure RBAC, manage assignments in Azure Blueprints, or share image galleries.
Box 2: No
Box 3: Yes
DBAGroup2 is member of the SQL DB Contributor role.
The SQL DB Contributor role lets you manage SQL databases, but not access to them. Also, you can ' t manage their security-related policies or their parent SQL servers. As a member of this role you can create and manage SQL databases.
Which counter should you monitor for real-time processing to meet the technical requirements?
SU% Utilization
CPU% utilization
Concurrent users
Data Conversion Errors
Scenario: Real-time processing must be monitored to ensure that workloads are sized properly based on actual usage patterns.
To monitor the performance of a database in Azure SQL Database and Azure SQL Managed Instance, start by monitoring the CPU and IO resources used by your workload relative to the level of database performance you chose in selecting a particular service tier and performance level.
You need to implement a solution to notify the administrators. The solution must meet the monitoring requirements.
What should you do?
Create an Azure Monitor alert rule that has a static threshold and assign the alert rule to an action group.
Add a diagnostic setting that logs QueryStoreRuntimeStatistics and streams to an Azure event hub.
Add a diagnostic setting that logs Timeouts and streams to an Azure event hub.
Create an Azure Monitor alert rule that has a dynamic threshold and assign the alert rule to an action group.
You need to design a data retention solution for the Twitter feed data records. The solution must meet the customer sentiment analytics requirements.
Which Azure Storage functionality should you include in the solution?
time-based retention
change feed
lifecycle management
soft delete
The lifecycle management policy lets you:
Delete blobs, blob versions, and blob snapshots at the end of their lifecycles
You need to recommend a solution that will enable remote developers to access DB1 and DB2. The solution must support the planned changes and meet the secunty requirements.
What should you include in the recommendation?
a public endpoint via a database-level firewall rule
a private endpoint
a public endpoint via a server-level firewall rule
a Point-to-Site (P2S) VPN
Basic Concept: This question tests secure database administration, where the control must match the data state, access boundary, identity model, or compliance requirement.
Why B is Correct: a private endpoint matches the expected DP-300 administration action. A private endpoint exposes an Azure service through a private IP address in a virtual network, avoiding public endpoint dependency. The question is not asking for a general Azure capability; it is asking for the feature that produces this result: You need to recommend a solution that will enable remote developers to access DB1 and DB2.
Why A is Wrong: a public endpoint via a database-level firewall rule is a security-related control, but its value depends on whether the requirement is identity, encryption, auditing, network isolation, or data exposure reduction. It does not satisfy the required identity, encryption, firewall, auditing, or data-exposure boundary described in the scenario: You need to recommend a solution that will enable remote developers to access DB1 and DB2.
Why C is Wrong: a public endpoint via a server-level firewall rule is a security-related control, but its value depends on whether the requirement is identity, encryption, auditing, network isolation, or data exposure reduction. It is not the right enforcement point for this case; the scenario needs the control that governs the data or identity path being tested.
Why D is Wrong: a Point-to-Site (P2S) VPN is a security-related control, but its value depends on whether the requirement is identity, encryption, auditing, network isolation, or data exposure reduction. It does not satisfy the required identity, encryption, firewall, auditing, or data-exposure boundary described in the scenario: You need to recommend a solution that will enable remote developers to access DB1 and DB2.
You have an on-premises Microsoft SQL server that uses the FileTables and Filestream features.
You plan to migrate to Azure SQL.
Which service should you use?
Azure SQL Database
SQL Server on an Azure Virtual Machine
Azure SQL Managed Instance
Azure Database for MySQL
You need to recommend a solution to meet the security requirements and the business requirements for DB3. What should you recommend as the first step of the solution?
Run the sys.5p_cdc_en«ble_db stored procedure.
Run the alter table statement and specify the enable chahgc_tracking clause.
Run the alter database statement and specify the set cmange_trackinc > - on clause.
Run the sp_addarticle stored procedure.
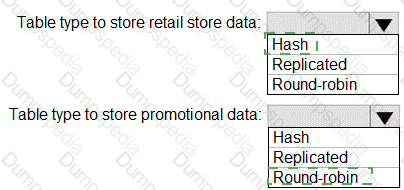
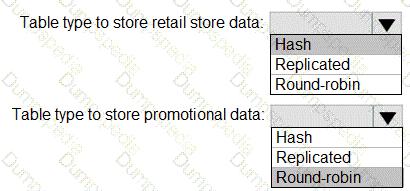
You need to design an analytical storage solution for the transactional data. The solution must meet the sales transaction dataset requirements.
What should you include in the solution? To answer, select the appropriate options in the answer area.
NOTE: Each correct selection is worth one point.
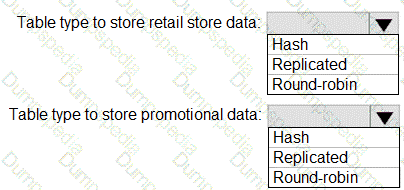


Box 1: Hash
Scenario:
Ensure that queries joining and filtering sales transaction records based on product ID complete as quickly as possible.
A hash distributed table can deliver the highest query performance for joins and aggregations on large tables.
Box 2: Round-robin
Scenario:
You plan to create a promotional table that will contain a promotion ID. The promotion ID will be associated to a specific product. The product will be identified by a product ID. The table will be approximately 5 GB.
A round-robin table is the most straightforward table to create and delivers fast performance when used as a staging table for loads. These are some scenarios where you should choose Round robin distribution:
When you cannot identify a single key to distribute your data.
If your data doesn’t frequently join with data from other tables.
When there are no obvious keys to join.
You need to identify the event_flle target for monitonng DB3 after the migration to Azure SQL Database. The solution must meet the management requirements,
What should you use as the event_file target?
an Azure SQL database
an Azure Blob Storage container
a SQL Server filegroup
an Azure Files share
Basic Concept: This question tests choosing the correct Azure migration approach by matching the source platform, target service, downtime tolerance, and administrative effort.
Why B is Correct: an Azure Blob Storage container matches the expected DP-300 administration action. an Azure Blob Storage container is an Azure data-platform feature, but it must match the workload model, service tier, migration path, or deployment constraint described in the scenario. The question is not asking for a general Azure capability; it is asking for the feature that produces this result: You need to identify the event_flle target for monitonng DB3 after the migration to Azure SQL Database.
Why A is Wrong: an Azure SQL database is an Azure data-platform feature, but it must match the workload model, service tier, migration path, or deployment constraint described in the scenario. It mismatches the target platform, migration method, compute tier, or deployment model described in the scenario, so it would not satisfy the workload as stated.
Why C is Wrong: a SQL Server filegroup is an Azure data-platform feature, but it must match the workload model, service tier, migration path, or deployment constraint described in the scenario. It would solve a neighboring problem, but not the deployment, sizing, or migration requirement in this item.
Why D is Wrong: an Azure Files share is an Azure data-platform feature, but it must match the workload model, service tier, migration path, or deployment constraint described in the scenario. It mismatches the target platform, migration method, compute tier, or deployment model described in the scenario, so it would not satisfy the workload as stated.
You need to implement the surrogate key for the retail store table. The solution must meet the sales transaction dataset requirements.
What should you create?
a table that has a FOREIGN KEY constraint
a table the has an IDENTITY property
a user-defined SEQUENCE object
a system-versioned temporal table
Scenario: Contoso requirements for the sales transaction dataset include:
Implement a surrogate key to account for changes to the retail store addresses.
A surrogate key on a table is a column with a unique identifier for each row. The key is not generated from the
table data. Data modelers like to create surrogate keys on their tables when they design data warehouse models. You can use the IDENTITY property to achieve this goal simply and effectively without affecting load performance.
You need to recommend a solution to ensure that the performance of DB3 is optimized after the migration to Azure SQL Database. The solution must meet availability requirements.
What should you include in the recommendation?
Resource Governor
a custom resource pool
vertical scaling
horizontal scaling
Basic Concept: This question tests choosing the correct Azure migration approach by matching the source platform, target service, downtime tolerance, and administrative effort.
Why C is Correct: vertical scaling is related to operational monitoring or tuning, but it must match the exact signal needed: query history, resource utilization, wait/blocking detail, or automatic remediation. In this scenario, the important constraint is: You need to recommend a solution to ensure that the performance of DB3 is optimized after the migration to Azure SQL Database. vertical scaling satisfies that constraint without adding an unrelated service or manual process.
Why A is Wrong: Resource Governor is related to operational monitoring or tuning, but it must match the exact signal needed: query history, resource utilization, wait/blocking detail, or automatic remediation. It does not expose the required metric, query history, wait/blocking signal, or tuning mechanism; using it would not give the administrator the evidence requested.
Why B is Wrong: a custom resource pool is related to operational monitoring or tuning, but it must match the exact signal needed: query history, resource utilization, wait/blocking detail, or automatic remediation. It is useful in other troubleshooting paths, but this scenario requires a more specific monitoring or optimization feature.
Why D is Wrong: horizontal scaling is related to operational monitoring or tuning, but it must match the exact signal needed: query history, resource utilization, wait/blocking detail, or automatic remediation. It does not expose the required metric, query history, wait/blocking signal, or tuning mechanism; using it would not give the administrator the evidence requested.
What should you do after a failover of SalesSQLDb1 to ensure that the database remains accessible to SalesSQLDb1App1?
Configure SalesSQLDb1 as writable.
Update the connection strings of SalesSQLDb1App1.
Update the firewall rules of SalesSQLDb1.
Update the users in SalesSQLDb1.
Scenario: SalesSQLDb1 uses database firewall rules and contained database users.
Basic Concept: This question tests high availability and disaster recovery design for Azure SQL, SQL Server on Azure VMs, and regional failure scenarios.
Why B is Correct: Update the connection strings of SalesSQLDb1App1. is part of the availability or recovery design space, but the correct choice must satisfy the specified failover, restore, quorum, RPO, or RTO requirement. In this scenario, the important constraint is: What should you do after a failover of SalesSQLDb1 to ensure that the database remains accessible to SalesSQLDb1App1? Update the connection strings of SalesSQLDb1App1. satisfies that constraint without adding an unrelated service or manual process.
Why A is Wrong: Configure SalesSQLDb1 as writable. is part of the availability or recovery design space, but the correct choice must satisfy the specified failover, restore, quorum, RPO, or RTO requirement. It is not wrong technology in general, but it is the wrong HA/DR control for this scenario ' s failure model.
Why C is Wrong: Update the firewall rules of SalesSQLDb1. is part of the availability or recovery design space, but the correct choice must satisfy the specified failover, restore, quorum, RPO, or RTO requirement. It handles a different resilience pattern and would not deliver the failover or recovery behavior required here.
Why D is Wrong: Update the users in SalesSQLDb1. is part of the availability or recovery design space, but the correct choice must satisfy the specified failover, restore, quorum, RPO, or RTO requirement. It is not wrong technology in general, but it is the wrong HA/DR control for this scenario ' s failure model.
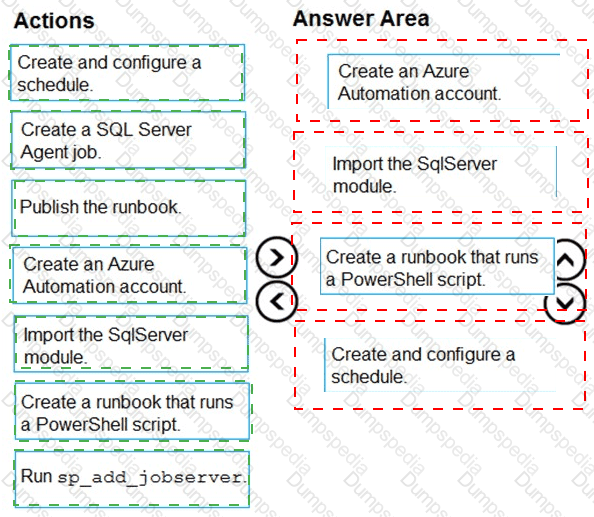
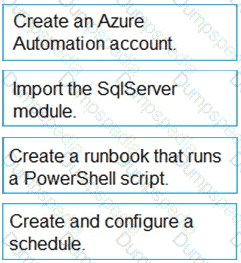
You need to implement statistics maintenance for SalesSQLDb1. The solution must meet the technical requirements.
Which four actions should you perform in sequence? To answer, move the appropriate actions from the list of actions to the answer area and arrange them in the correct order.
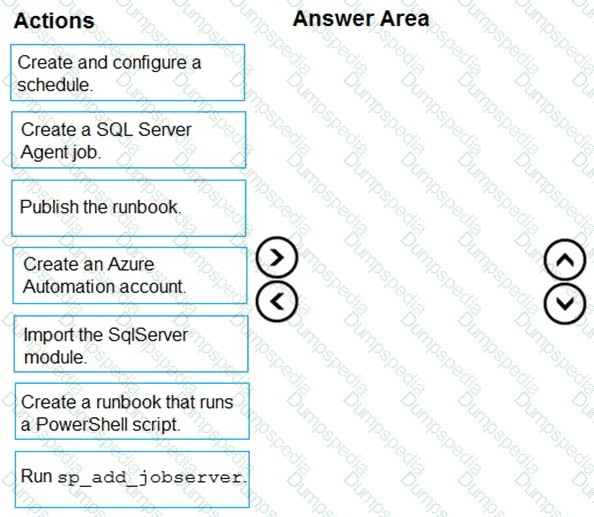


Automating Azure SQL DB index and statistics maintenance using Azure Automation:
1. Create Azure automation account (Step 1)
2. Import SQLServer module (Step 2)
3. Add Credentials to access SQL DB
This will use secure way to hold login name and password that will be used to access Azure SQL DB
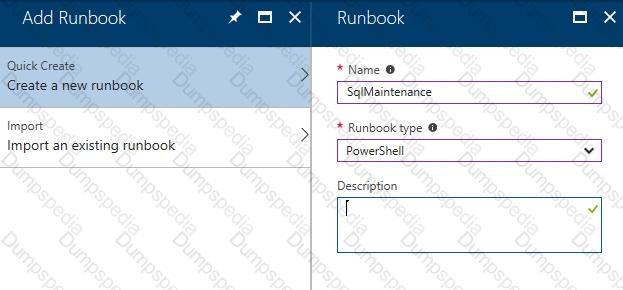
4. Add a runbook to run the maintenance (Step 3)
Steps:
1. Click on " runbooks " at the left panel and then click " add a runbook "
2. Choose " create a new runbook " and then give it a name and choose " Powershell " as the type of the runbook and then click on " create "

5. Schedule task (Step 4)
Steps:
1. Click on Schedules
2. Click on " Add a schedule " and follow the instructions to choose existing schedule or create a new schedule.
You need to recommend a process to automate the management of DB3. The solution must meet the management requirements. What should be the first step of the process?
Configure Microsoft Entra authentication for the logical server that hosts DB3.
Create a database that has database-scoped credentials.
Configure a private endpoint for connectivity to DB3.
Create data base-scoped credentials in DB3.
Basic Concept: This question tests identity and authentication for Azure SQL and SQL Server workloads, including when to use contained users, directory identities, certificate validation, or authentication profiles.
Why C is Correct: A private endpoint exposes an Azure service through a private IP address in a virtual network, avoiding public endpoint dependency. The scenario asks for: You need to recommend a process to automate the management of DB3. That makes Configure a private endpoint for connectivity to DB3. the option that satisfies the required Azure SQL layer and operational outcome.
Why A is Wrong: Configure Microsoft Entra authentication for the logical server that hosts DB3. is a security-related control, but its value depends on whether the requirement is identity, encryption, auditing, network isolation, or data exposure reduction. It is not the right enforcement point for this case; the scenario needs the control that governs the data or identity path being tested.
Why B is Wrong: Create a database that has database-scoped credentials. is a security-related control, but its value depends on whether the requirement is identity, encryption, auditing, network isolation, or data exposure reduction. It does not satisfy the required identity, encryption, firewall, auditing, or data-exposure boundary described in the scenario: You need to recommend a process to automate the management of DB3.
Why D is Wrong: Create data base-scoped credentials in DB3. is a security-related control, but its value depends on whether the requirement is identity, encryption, auditing, network isolation, or data exposure reduction. It is not the right enforcement point for this case; the scenario needs the control that governs the data or identity path being tested.
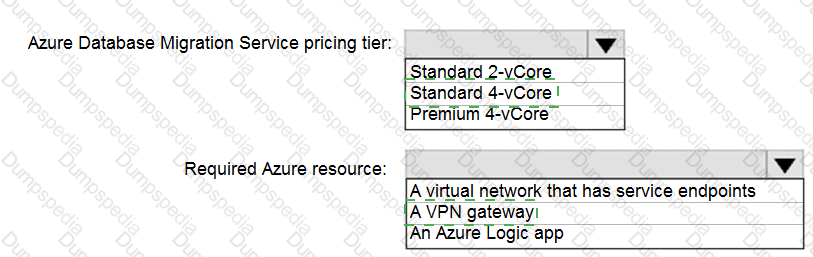
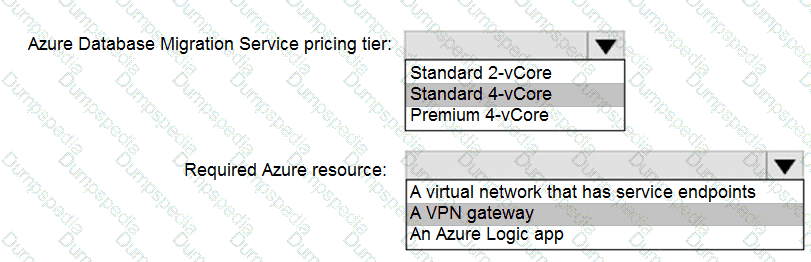
You are planning the migration of the SERVER1 databases. The solution must meet the business requirements.
What should you include in the migration plan? To answer, select the appropriate options in the answer area.
NOTE: Each correct selection is worth one point.
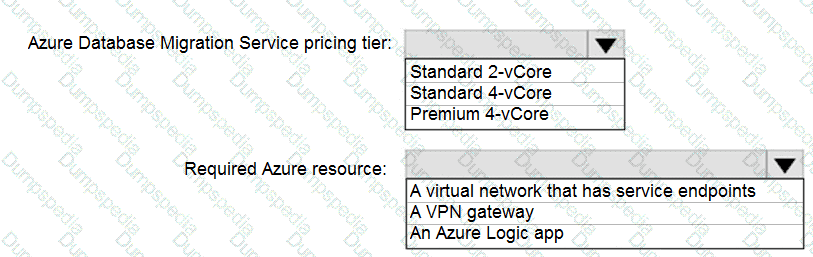


Azure Database Migration service
Box 1: Premium 4-VCore
Scenario: Migrate the SERVER1 databases to the Azure SQL Database platform.
Minimize downtime during the migration of the SERVER1 databases.
Premimum 4-vCore is for large or business critical workloads. It supports online migrations, offline migrations, and faster migration speeds.
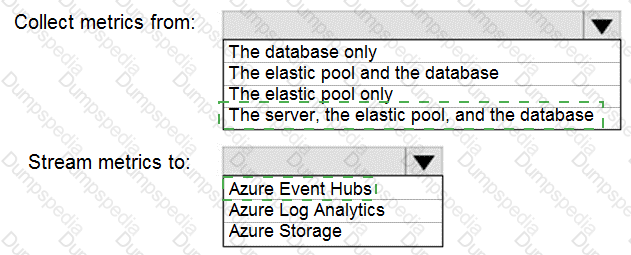
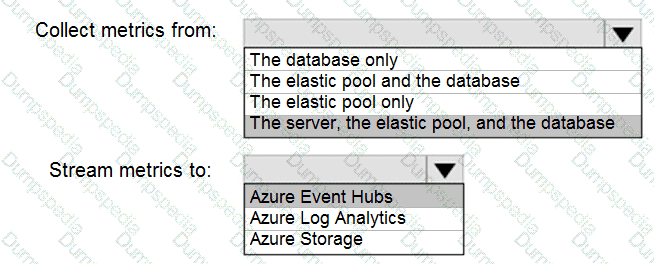
You need to implement the monitoring of SalesSQLDb1. The solution must meet the technical requirements.
How should you collect and stream metrics? To answer, select the appropriate options in the answer area.
NOTE: Each correct selection is worth one point.
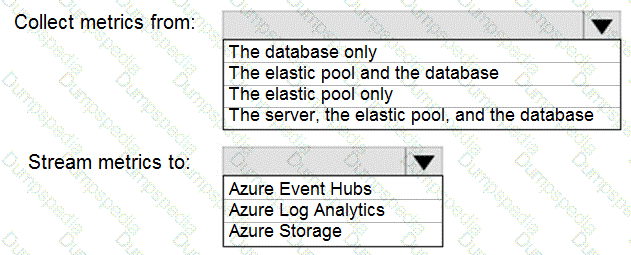


Box 1: The server, the elastic pool, and the database
Senario:
SalesSQLDb1 is in an elastic pool named SalesSQLDb1Pool.
Litware technical requirements include: all SQL Server and Azure SQL Database metrics related to CPU and storage usage and limits must be analyzed by using Azure built-in functionality.
Box 2: Azure Event hubs
Scenario: Migrate ManufacturingSQLDb1 to the Azure virtual machine platform.
Event hubs are able to handle custom metrics.
Basic Concept: This question tests Azure monitoring and performance management, including which metric, log destination, or alerting behavior fits the operational requirement.
Why the selected answer is Correct: The selected values fit this scenario because they apply the required Azure SQL configuration at the correct scope and sequence: You need to implement the monitoring of SalesSQLDb1.
Why the alternate choices are Wrong: The alternate destinations or collection scopes miss part of the telemetry requirement: they either omit the server/pool/database layer or send data somewhere that does not support the requested analysis path.
You need to identify the cause of the performance issues on SalesSQLDb1.
Which two dynamic management views should you use? Each correct answer presents part of the solution.
NOTE: Each correct selection is worth one point.
sys.dm_pdw_nodes_tran_locks
sys.dm_exec_compute_node_errors
sys.dm_exec_requests
sys.dm_cdc_errors
sys.dm_pdw_nodes_os_wait_stats
sys.dm_tran_locks
SalesSQLDb1 experiences performance issues that are likely due to out-of-date statistics and frequent blocking queries.
A: Use sys.dm_pdw_nodes_tran_locks instead of sys.dm_tran_locks from Azure Synapse Analytics (SQL Data Warehouse) or Parallel Data Warehouse.
E: Example:
The following query will show blocking information.
SELECT
t1.resource_type,
t1.resource_database_id,
t1.resource_associated_entity_id,
t1.request_mode,
t1.request_session_id,
t2.blocking_session_id
FROM sys.dm_tran_locks as t1
INNER JOIN sys.dm_os_waiting_tasks as t2
ON t1.lock_owner_address = t2.resource_address;
Note: Depending on the system you’re working with you can access these wait statistics from one of three locations:
sys.dm_os_wait_stats: for SQL Server
sys.dm_db_wait_stats: for Azure SQL Database
sys.dm_pdw_nodes_os_wait_stats: for Azure SQL Data Warehouse
You are evaluating the business goals.
Which feature should you use to provide customers with the required level of access based on their service agreement?
dynamic data masking
Conditional Access in Azure
service principals
row-level security (RLS)
You need to provide an implementation plan to configure data retention for ResearchDB1. The solution must meet the security and compliance requirements.
What should you include in the plan?
Configure the Deleted databases settings for ResearchSrvOL
Deploy and configure an Azure Backup server.
Configure the Advanced Data Security settings for ResearchDBL
Configure the Manage Backups settings for ResearchSrvOL
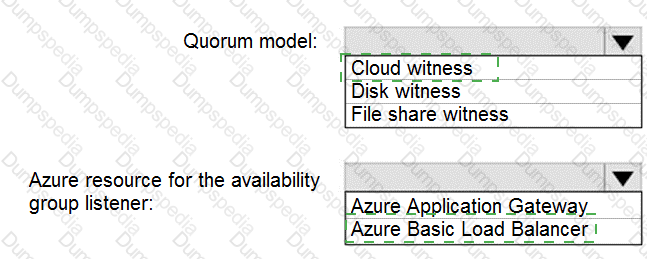
You need to recommend a configuration for ManufacturingSQLDb1 after the migration to Azure. The solution must meet the business requirements.
What should you include in the recommendation? To answer, select the appropriate options in the answer area.
NOTE: Each correct selection is worth one point.
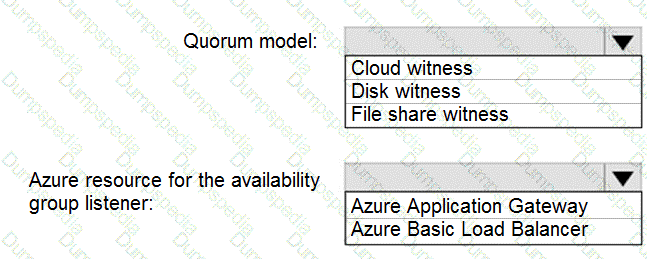


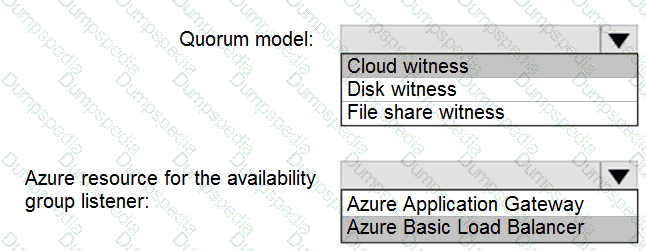
Scenario: Business Requirements
Litware identifies business requirements include: meet an SLA of 99.99% availability for all Azure deployments.
Box 1: Cloud witness
If you have a Failover Cluster deployment, where all nodes can reach the internet (by extension of Azure), it is recommended that you configure a Cloud Witness as your quorum witness resource.
Box 2: Azure Basic Load Balancer
Microsoft guarantees that a Load Balanced Endpoint using Azure Standard Load Balancer, serving two or more Healthy Virtual Machine Instances, will be available 99.99% of the time.
Note: There are two main options for setting up your listener: external (public) or internal. The external (public) listener uses an internet facing load balancer and is associated with a public Virtual IP (VIP) that is accessible over the internet. An internal listener uses an internal load balancer and only supports clients within the same Virtual Network.
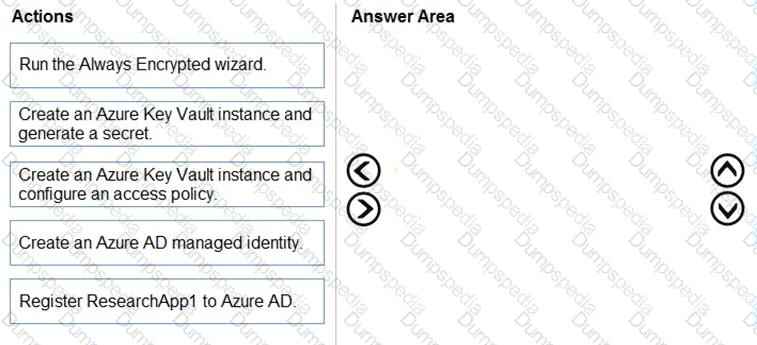
You create all of the tables and views for ResearchDB1.
You need to implement security for ResearchDB1. The solution must meet the security and compliance requirements.
Which three actions should you perform in sequence? To answer, move the appropriate actions from the list of actions to the answer area and arrange them in the correct order.

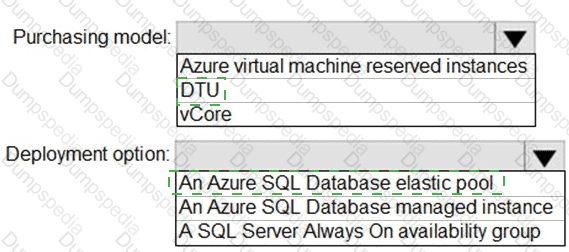
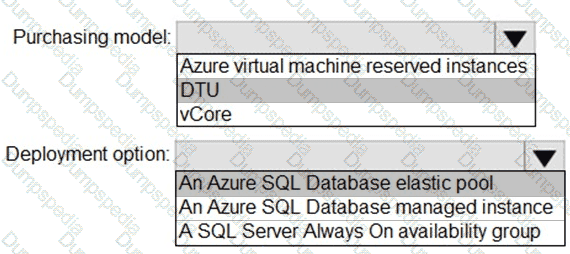
You need to recommend the appropriate purchasing model and deployment option for the 30 new databases. The solution must meet the technical requirements and the business requirements.
What should you recommend? To answer, select the appropriate options in the answer area.
NOTE: Each correct selection is worth one point.
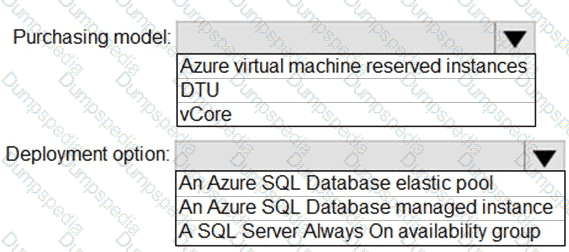


Box 1: DTU
Scenario:
The 30 new databases must scale automatically.
Once all requirements are met, minimize costs whenever possible.
You can configure resources for the pool based either on the DTU-based purchasing model or the vCore-based purchasing model.
In short, for simplicity, the DTU model has an advantage. Plus, if you’re just getting started with Azure SQL Database, the DTU model offers more options at the lower end of performance, so you can get started at a lower price point than with vCore.
Box 2: An Azure SQL database elastic pool
Azure SQL Database elastic pools are a simple, cost-effective solution for managing and scaling multiple databases that have varying and unpredictable usage demands. The databases in an elastic pool are on a single server and share a set number of resources at a set price. Elastic pools in Azure SQL Database enable SaaS developers to optimize the price performance for a group of databases within a prescribed budget while delivering performance elasticity for each database.
Task 6
You need to ensure that you can connect to db1 by using a private IP address on a virtual network named VNET1 You may need to use SQL Server Management Studio and the Azure portal.
See the explanation part for the complete Solution.
Create an Azure Private Endpoint for the Azure SQL logical server that hosts db1, place the private endpoint in VNET1, and integrate it with the private DNS zone:
privatelink.database.windows.net
This is the correct solution because Azure SQL Database is a PaaS service. You do not assign a private IP directly to db1. Instead, Azure creates a private endpoint network interface in the virtual network. That private endpoint receives a private IP address from a subnet in VNET1, and clients in VNET1 use that private IP path to reach the SQL server. Microsoft defines a private endpoint as a network interface that uses a private IP address from your virtual network to connect privately to a Private Link resource such as Azure SQL Database.
Azure Portal Method — Recommended for Simulation
Step 1: Identify the SQL logical server that hosts db1
Sign in to the Azure portal.
Search for SQL databases.
Open db1.
On the database overview page, identify the Server name.
The private endpoint is created for the Azure SQL logical server, not for the database object alone. For Azure SQL Database, the Private Link resource type is:
Microsoft.Sql/servers
and the target subresource is:
sqlServer
Microsoft lists Azure SQL Database private endpoint DNS configuration under Microsoft.Sql/servers with subresource sqlServer.
Step 2: Open the SQL server networking page
Open the Azure SQL logical server that hosts db1.
In the left menu, go to:
Security > Networking
Select the Private access tab.
Select Create a private endpoint.
Microsoft’s Azure SQL private endpoint workflow is performed from the SQL server resource under Networking > Private access, where you can create or manage private endpoint connections.
Step 3: Configure the private endpoint basics
On the Create private endpoint page:
Setting
Value
Subscription
Use the lab subscription
Resource group
Use the lab resource group
Name
pe-db1-sql
Region
Same region as VNET1, if possible
The name is not exam-critical. The critical part is that the endpoint is associated with VNET1 and the SQL server that hosts db1.
Step 4: Configure the target resource
On the Resource tab, configure:
Setting
Value
Connection method
Connect to an Azure resource in my directory
Resource type
Microsoft.Sql/servers
Resource
SQL logical server that hosts db1
Target sub-resource
sqlServer
Do not choose storage, VM, managed instance, or any unrelated resource type. This is Azure SQL Database, so the target subresource must be sqlServer.
Step 5: Configure VNET1 and subnet
On the Virtual Network tab:
Setting
Value
Virtual network
VNET1
Subnet
Select an available subnet in VNET1
Private IP configuration
Dynamic is fine unless the lab requires static
Azure will create a network interface for the private endpoint and assign it a private IP address from the selected subnet. Microsoft notes that the network interface page for the private endpoint shows the private IP address assigned to the private endpoint connection.
Step 6: Configure private DNS integration
On the DNS tab:
Enable private DNS zone integration.
Use or create the private DNS zone:
privatelink.database.windows.net
Link the private DNS zone to:
VNET1
This is not optional in a clean exam solution. Without DNS integration, clients may still resolve the SQL server name to the public endpoint instead of the private endpoint. Microsoft states that DNS is critical because it resolves the private endpoint IP address, and for Azure SQL Database the recommended private DNS zone is privatelink.database.windows.net.
Step 7: Review and create
Select Review + create.
Confirm:
Resource: SQL logical server hosting db1
Target subresource: sqlServer
Virtual network: VNET1
Private DNS zone: privatelink.database.windows.net
Select Create.
After deployment, the SQL server will have a private endpoint connection associated with VNET1.
Step 8: Approve the private endpoint connection if required
In most same-directory deployments, approval may be automatic. If approval is pending:
Open the SQL logical server.
Go to:
Networking > Private access
Select the pending private endpoint connection.
Select Approve.
Microsoft documents that SQL administrators can approve or reject private endpoint connections from the SQL server private access page.
Step 9: Optional but recommended — Disable public network access
The task only says you need to connect by private IP from VNET1. It does not explicitly say to block public access. But if the exam expects private-only access, then disable public access after the private endpoint works.
On the SQL logical server:
Go to:
Security > Networking > Public access
Set Public network access to:
Disabled
or select:
Deny public network access
Save.
Be careful: Microsoft states that adding a private endpoint does not automatically block public routing to the logical server. Public access must be denied separately if you want private-only access.
How to Connect from SSMS
You should connect from a machine that is inside VNET1, such as an Azure VM joined to VNET1.
Step 1: Test DNS from a VM in VNET1
From a VM in VNET1, run:
nslookup < sql-server-name > .database.windows.net
Expected result: the name should resolve through the private endpoint path and return a private IP address from VNET1’s address space.
Microsoft explains that connection URLs do not change; DNS resolution is overridden so the existing service FQDN resolves to the private endpoint private IP address.
Step 2: Connect with SSMS
In SSMS, connect using the normal Azure SQL server name:
< sql-server-name > .database.windows.net
Then select database:
db1
Use normal SQL authentication or Microsoft Entra authentication.
Do not type the raw private IP address into SSMS unless the lab specifically forces it. For Azure SQL, the correct operational pattern is to connect to the SQL server FQDN and allow private DNS to resolve that FQDN to the private endpoint IP. Direct IP connection can cause TLS/certificate name problems because the server certificate matches the DNS name, not the private IP.
Verification
The task is complete when all of these are true:
Private endpoint exists for the SQL logical server hosting db1.
Target subresource is sqlServer.
The private endpoint is deployed into VNET1.
A private IP address is assigned to the private endpoint NIC.
Private DNS zone privatelink.database.windows.net exists.
The private DNS zone is linked to VNET1.
The SQL server FQDN resolves to the private endpoint private IP from inside VNET1.
SSMS can connect to db1 from a VM or client connected to VNET1.
Final Exam-Lab Action
Use the Azure portal and configure:
SQL server hosting db1
> Networking
> Private access
> Create private endpoint
Resource type: Microsoft.Sql/servers
Target subresource: sqlServer
Virtual network: VNET1
Private DNS zone: privatelink.database.windows.net
Then connect from a VM or client in VNET1 using:
< sql-server-name > .database.windows.net
That is the correct way to ensure db1 is reachable through a private IP address on VNET1.
You need to configure user authentication for the SERVER1 databases. The solution must meet the security and compliance requirements.
Which three actions should you perform in sequence? To answer, move the appropriate actions from the list of actions to the answer area and arrange them in the correct order.
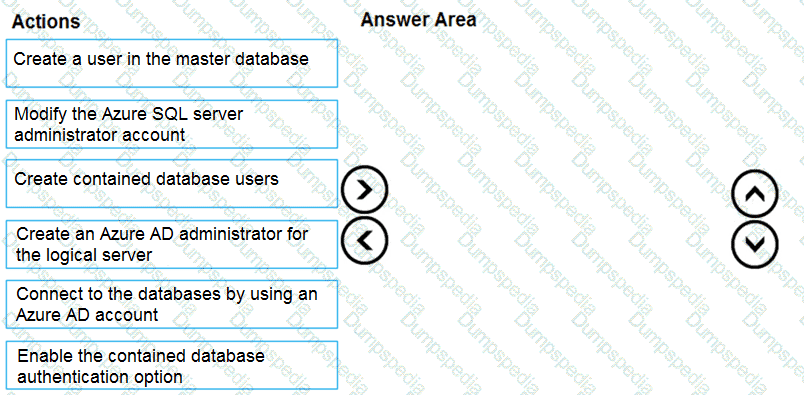


Scenario: Authenticate database users by using Active Directory credentials.
The configuration steps include the following procedures to configure and use Azure Active Directory authentication.
Create and populate Azure AD.
Optional: Associate or change the active directory that is currently associated with your Azure Subscription.
Create an Azure Active Directory administrator. (Step 1)
Configure your client computers.
Create contained database users in your database mapped to Azure AD identities. (Step 2)
Connect to your database by using Azure AD identities. (Step 3)
You need to implement authentication for ResearchDB1. The solution must meet the security and compliance requirements.
What should you run as part of the implementation?
CREATE LOGIN and the FROM WINDOWS clause
CREATE USER and the FROM CERTIFICATE clause
CREATE USER and the FROM LOGIN clause
CREATE USER and the ASYMMETRIC KEY clause
CREATE USER and the FROM EXTERNAL PROVIDER clause
Scenario: Authenticate database users by using Active Directory credentials.
(Create a new Azure SQL database named ResearchDB1 on a logical server named ResearchSrv01.)
Authenticate the user in SQL Database or SQL Data Warehouse based on an Azure Active Directory user:
CREATE USER [Fritz@contoso.com] FROM EXTERNAL PROVIDER;
You need to recommend a solution to ensure that the customers can create the database objects. The solution must meet the business goals.
What should you include in the recommendation?
For each customer, grant the customer ddl_admin to the existing schema.
For each customer, create an additional schema and grant the customer ddl_admin to the new schema.
For each customer, create an additional schema and grant the customer db_writerto the new schema.
For each customer, grant the customer db_writerto the existing schema.
Basic Concept: This question tests plan and configure a high availability and disaster recovery (ha/dr) environment in the DP-300 exam context. The correct choice is determined by the exact service boundary and operational requirement stated in the scenario.
Why B is Correct: For each customer, create an additional schema and grant the customer ddl_admin to the new schema. matches the expected DP-300 administration action. For each customer, create an additional schema and grant the customer ddl_admin to the new schema. is part of the availability or recovery design space, but the correct choice must satisfy the specified failover, restore, quorum, RPO, or RTO requirement. The question is not asking for a general Azure capability; it is asking for the feature that produces this result: You need to recommend a solution to ensure that the customers can create the database objects.
Why A is Wrong: For each customer, grant the customer ddl_admin to the existing schema. is part of the availability or recovery design space, but the correct choice must satisfy the specified failover, restore, quorum, RPO, or RTO requirement. It handles a different resilience pattern and would not deliver the failover or recovery behavior required here.
Why C is Wrong: For each customer, create an additional schema and grant the customer db_writerto the new schema. is part of the availability or recovery design space, but the correct choice must satisfy the specified failover, restore, quorum, RPO, or RTO requirement. It does not meet the failover, restore, quorum, or cross-region continuity target stated in the question, even if it is valid in a different availability design.
Why D is Wrong: For each customer, grant the customer db_writerto the existing schema. is part of the availability or recovery design space, but the correct choice must satisfy the specified failover, restore, quorum, RPO, or RTO requirement. It handles a different resilience pattern and would not deliver the failover or recovery behavior required here.
Task 7
You plan to create an automation runbook that will create database users in db1 from Azure AD identities. You need to configure sq1370O6895 to support the creation of new database users.
See the explanation part for the complete Solution.
To configure sq1370O6895 to support the creation of new database users from Azure AD identities, you need to do the following steps:
Set up a Microsoft Entra tenant and associate it with your Azure subscription. You can use the Microsoft Entra portal or the Azure portal to create and manage your Microsoft Entra users and groups12.
Configure a Microsoft Entra admin for sq1370O6895. You can use the Azure portal or the Azure CLI to set a Microsoft Entra user as the admin for the server34. The Microsoft Entra admin can create other database users from Microsoft Entra identities5.
Connect to db1 using the Microsoft Entra admin account and run the following Transact-SQL statement to create a new database user from a Microsoft Entra identity: CREATE USER [Microsoft Entra user name] FROM EXTERNAL PROVIDER;6 You can replace the Microsoft Entra user name with the name of the user or group that you want to create in the database.
Grant the appropriate permissions to the new database user by adding them to a database role or granting them specific privileges. For example, you can run the following Transact-SQL statement to add the new user to the db_datareader role: ALTER ROLE db_datareader ADD MEMBER [Microsoft Entra user name];
These are the steps to configure sq1370O6895 to support the creation of new database users from Azure AD identities.
Task 12
You need to configure high availability for dbl. The solution must tolerate the loss of an Azure datacenter without data loss or the need to modify application connection strings.
See the explanation part for the complete Solution.
To configure high availability for dbl, you can use the failover groups feature of Azure SQL Database. Failover groups allow you to manage the replication and failover of a group of databases across different regions with the same connection strings1. You can choose all, or a subset of, user databases in a logical server to be replicated to another logical server in a different region. You can also specify the failover policy, such as manual or automatic, and the grace period for data loss.
Here are the steps to create a failover group for dbl:
Using the Azure portal:
Go to the Azure portal and select your Azure SQL Database server that hosts dbl.
Select Failover groups in the left menu and click on Add group.
Enter a name for the failover group and select a secondary region that is different from the primary region.
Click on Create a new server and enter the details for the secondary server, such as server name, admin login, password, and subscription.
Click on Select existing database(s) and choose dbl from the list of databases on the primary server.
Click on Configure failover policy and select the failover mode, grace period, and read-write failover endpoint mode according to your preferences.
Click on Create to create the failover group and start the replication of dbl to the secondary server.
Using PowerShell commands:
Install the Azure PowerShell module and log in with your Azure account.
Run the following command to create a new server in the secondary region: New-AzSqlServer -ResourceGroupName < your-resource-group-name > -ServerName < your-secondary-server-name > -Location " < secondary-region-name > " -SqlAdministratorCredentials $(New-Object -TypeName System.Management.Automation.PSCredential -ArgumentList " < your-admin-login > " , $(ConvertTo-SecureString -String " < your-password > " -AsPlainText -Force))
Run the following command to create a new failover group with dbl: New-AzSqlDatabaseFailoverGroup -ResourceGroupName < your-resource-group-name > -ServerName < your-primary-server-name > -PartnerResourceGroupName < your-resource-group-name > -PartnerServerName < your-secondary-server-name > -FailoverGroupName < your-failover-group-name > -Database dbl -FailoverPolicy < manual-or-automatic > -GracePeriodWithDataLossHours < grace-period-in-hours > -ReadWriteFailoverEndpoint " < enabled-or-disabled > "
You can modify the parameters of the command according to your preferences, such as the failover policy, grace period, and read-write failover endpoint mode.
These are the steps to create a failover group for dbl
Task 5
You need to generate an email alert for db1 if the average CPU percentage utilization is greater than 50 percent for five minutes sampled at one-minute intervals. The alert must be sent to admin@contoso.com.
You may need to use SQL Server Management Studio and the Azure portal.
See the explanation part for the complete Solution.
Create an Azure Monitor metric alert rule on database db1 using the metric:
CPU percentage
Configure the condition as:
Aggregation: Average
Operator: Greater than
Threshold: 50
Aggregation granularity / Period: 1 minute
Frequency of evaluation: 1 minute
Evaluation period / Lookback window: 5 minutes
Action group email: admin@contoso.com
Azure SQL Database exposes CPU percentage as a platform metric, and Azure Monitor metric alerts can send notifications through action groups such as email. Microsoft describes SQL Database alerts as metric-based alerts that can send email when metrics such as CPU usage reach a defined threshold.
Azure Portal Method — Recommended for Simulation
Step 1: Open the db1 Azure SQL database
Sign in to the Azure portal.
Search for SQL databases.
Open the database named:
db1
Do not open the SQL logical server unless the alert needs to apply to all databases. This task is specifically for db1, so the alert scope must be the db1 database resource.
Step 2: Create a new alert rule
From the db1 database page:
In the left menu, select Alerts.
Select Create.
Select Alert rule.
Microsoft’s Azure Monitor workflow allows you to create an alert rule directly from the target resource. When you create it from a resource, the resource is automatically set as the alert scope.
Step 3: Confirm the alert scope
On the alert rule page, confirm the scope is the Azure SQL database:
db1
The resource type should be similar to:
SQL database
Microsoft.Sql/servers/databases
If the scope is the SQL server instead of the database, remove it and select the db1 database resource.
Step 4: Add the alert condition
Under Condition, select Add condition.
Choose the metric:
CPU percentage
Sometimes it appears as:
CPU percent
or metric name:
cpu_percent
For Azure SQL Database, CPU percentage represents CPU consumption toward the database workload limit, expressed as a percentage.
Step 5: Configure the signal logic
Configure the alert logic exactly like this:
Setting
Value
Threshold type
Static
Aggregation type
Average
Operator
Greater than
Threshold value
50
Unit
Percent
Aggregation granularity / Period
1 minute
Frequency of evaluation
1 minute
Evaluation period / Lookback window
5 minutes
This means Azure Monitor evaluates the CPU metric every minute, using one-minute metric samples, and fires the alert only when the average CPU percentage is greater than 50% across the five-minute evaluation window.
Be precise here. The task says:
average CPU percentage utilization is greater than 50 percent for five minutes sampled at one-minute intervals
So the correct choices are:
Average
Greater than 50
Every 1 minute
Over the last 5 minutes
Azure Monitor metric alert rules combine the monitored resource, the metric condition, and action groups that run when the condition is met.
Step 6: Create the email action group
Under Actions, select:
Create action group
Configure the basics:
Setting
Value
Subscription
Use the current subscription
Resource group
Use the lab resource group
Action group name
AG-db1-CPU-Email
Display name
db1CPU
Then go to Notifications.
Add a notification:
Setting
Value
Notification type
Email/SMS message/Push/Voice
Name
EmailAdmin
admin@contoso.com
Select OK, then Review + create, then Create.
Action groups define the notification or automation action that runs when an alert fires. Microsoft documents email as a supported action group notification type.
Step 7: Configure alert rule details
Under Details, configure:
Setting
Value
Severity
2 or 3
Alert rule name
db1 CPU greater than 50 percent
Description
Alert when average CPU percentage for db1 is greater than 50 percent for 5 minutes.
Enable upon creation
Yes
Severity is usually not specified by the task, so any reasonable severity is acceptable. In an exam lab, I would use Severity 2 for CPU performance impact.
Step 8: Review and create
Select Review + create.
Confirm the condition says something equivalent to:
Whenever the average CPU percentage is greater than 50
Confirm the evaluation settings are:
Check every 1 minute
Lookback period 5 minutes
Confirm the action group sends email to:
admin@contoso.com
Select Create.
Verification
After creation:
Open db1.
Go to Alerts.
Select Alert rules.
Confirm the alert rule exists and is enabled.
Open the rule and verify:
Scope: db1
Signal: CPU percentage
Aggregation: Average
Operator: Greater than
Threshold: 50
Evaluation frequency: 1 minute
Window size: 5 minutes
Action group: admin@contoso.com
Azure CLI Method
Use this only if the simulation gives you Cloud Shell.
First get the database resource ID:
az sql db show \
--resource-group < resource-group-name > \
--server < sql-server-name > \
--name db1 \
--query id \
--output tsv
Create the action group:
az monitor action-group create \
--resource-group < resource-group-name > \
--name AG-db1-CPU-Email \
--short-name db1CPU \
--action email EmailAdmin admin@contoso.com
Create the metric alert:
az monitor metrics alert create \
--name " db1 CPU greater than 50 percent " \
--resource-group < resource-group-name > \
--scopes < db1-resource-id > \
--condition " avg cpu_percent > 50 " \
--window-size 5m \
--evaluation-frequency 1m \
--action AG-db1-CPU-Email \
--description " Alert when average CPU percentage for db1 is greater than 50 percent for 5 minutes. "
The metric name commonly used for Azure SQL Database CPU percentage in CLI/ARM contexts is:
cpu_percent
SSMS Clarification
SSMS is not the correct tool for this task.
Do not configure Database Mail. Azure SQL Database does not use SQL Server Agent/Database Mail in the same way as SQL Server on a VM or SQL Managed Instance. This requirement is an Azure Monitor metric alert requirement.
Correct tool:
Azure portal > db1 > Alerts > Create alert rule
Wrong tool:
SSMS Database Mail
Final Exam-Lab Configuration
Use this exact configuration:
Resource: db1
Alert type: Metric alert
Metric: CPU percentage
Aggregation: Average
Operator: Greater than
Threshold: 50
Aggregation granularity: 1 minute
Evaluation frequency: 1 minute
Evaluation period/window: 5 minutes
Action group notification: Email
Email recipient: admin@contoso.com
That completes the task.
Task 9
You need to ensure that when non-administrative users query the SalesLT.Customer table in db1, email addresses are obscured. For example, an email address of alice@contoso.com must appear as aXXX@XXXX.com.
You may need to use SQL Server Management Studio and the Azure portal.
See the explanation part for the complete Solution.
Configure Dynamic Data Masking on the email column in:
SalesLT.Customer
The column is normally:
EmailAddress
Use the built-in masking function:
email()
Microsoft documents that Dynamic Data Masking hides sensitive data in query results for nonprivileged users without changing the stored data. The built-in email() masking function exposes the first letter and returns the masked format aXXX@XXXX.com, which exactly matches the requirement.
Method 1 — SSMS / T-SQL Method
This is the fastest and most reliable method.
Step 1: Connect to db1
Open SQL Server Management Studio.
Connect to the Azure SQL logical server that hosts db1.
Open a query window against database:
db1
Step 2: Apply the email mask
Run:
ALTER TABLE [SalesLT].[Customer]
ALTER COLUMN [EmailAddress]
ADD MASKED WITH (FUNCTION = ' email() ' );
This adds a Dynamic Data Masking rule to the EmailAddress column. The actual email address remains stored in the table, but users without permission to view unmasked data will see the masked value. Microsoft’s documented syntax for adding an email mask is ALTER COLUMN Email ADD MASKED WITH (FUNCTION = ' email() ' ).
Step 3: Verify that the column is masked
Run:
SELECT
OBJECT_SCHEMA_NAME(mc.object_id) AS schema_name,
OBJECT_NAME(mc.object_id) AS table_name,
c.name AS column_name,
mc.masking_function
FROM sys.masked_columns AS mc
JOIN sys.columns AS c
ON mc.object_id = c.object_id
AND mc.column_id = c.column_id
WHERE OBJECT_SCHEMA_NAME(mc.object_id) = ' SalesLT '
AND OBJECT_NAME(mc.object_id) = ' Customer '
AND c.name = ' EmailAddress ' ;
Expected result:
schema_name SalesLT
table_name Customer
column_name EmailAddress
masking_function email()
Step 4: Test as a non-administrative user
If you have a test user, run:
EXECUTE AS USER = ' TestUser ' ;
SELECT TOP (10)
EmailAddress
FROM SalesLT.Customer;
REVERT;
Expected output should look like:
aXXX@XXXX.com
bXXX@XXXX.com
cXXX@XXXX.com
A user with administrative privileges, db_owner, or UNMASK permission can still see the original email value. Microsoft states that users with administrative rights such as server admin, Microsoft Entra admin, and db_owner can view the original unmasked data.
Method 2 — Azure Portal Method
Use this if the simulation expects portal configuration.
Step 1: Open db1
Sign in to the Azure portal.
Search for SQL databases.
Open database:
db1
Step 2: Open Dynamic Data Masking
From the db1 page:
Security > Dynamic Data Masking
Microsoft states that for Azure SQL Database, Dynamic Data Masking can be configured in the Azure portal from the SQL database configuration pane under Security > Dynamic Data Masking.
Step 3: Add a masking rule
Add a mask for the email column:
Setting
Value
Schema
SalesLT
Table
Customer
Column
EmailAddress
Masking field format
Masking function
email()
Then select:
Save
The portal may show the mask type simply as:
That is the correct option because it maps to the email() masking function.
Important Permission Check
Dynamic Data Masking only affects users who do not have permission to view unmasked data.
If a non-administrative user was previously granted UNMASK, remove it:
REVOKE UNMASK TO [UserName];
Or, if a role was granted UNMASK, revoke it from the role:
REVOKE UNMASK TO [RoleName];
Do not grant UNMASK to normal users. UNMASK allows users to bypass masking and see the original values. Microsoft documents that UNMASK permission controls whether users can view masked or original data.
Final Exam-Lab Action
Run this against db1:
ALTER TABLE [SalesLT].[Customer]
ALTER COLUMN [EmailAddress]
ADD MASKED WITH (FUNCTION = ' email() ' );
Then verify:
SELECT
OBJECT_SCHEMA_NAME(object_id) AS schema_name,
OBJECT_NAME(object_id) AS table_name,
name AS column_name,
masking_function
FROM sys.masked_columns
WHERE OBJECT_SCHEMA_NAME(object_id) = ' SalesLT '
AND OBJECT_NAME(object_id) = ' Customer '
AND name = ' EmailAddress ' ;
The task is complete when non-administrative users querying SalesLT.Customer.EmailAddress see masked email values such as:
aXXX@XXXX.com
Task 8
You need to increase the maximum storage size of the query store on db1 to 4,000 MB You may need to use SQL Server Management Studio and the Azure portal.
See the explanation part for the complete Solution.
Connect to db1 in SQL Server Management Studio and run:
ALTER DATABASE [db1]
SET QUERY_STORE (MAX_STORAGE_SIZE_MB = 4000);
Microsoft documents that Query Store maximum storage size is changed with:
ALTER DATABASE < database_name >
SET QUERY_STORE (MAX_STORAGE_SIZE_MB = < size > );
For Azure SQL Database, the maximum allowed MAX_STORAGE_SIZE_MB value is 10,240 MB, so 4,000 MB is valid.
Method 1 — SSMS / T-SQL Method
This is the cleanest method for the simulation.
Step 1: Open SQL Server Management Studio
Open SQL Server Management Studio.
Connect to the Azure SQL logical server that hosts db1.
Use SQL authentication or Microsoft Entra authentication.
In Connection Properties, select:
db1
You can also connect to master, but for this task it is cleaner to open a query window in db1.
Step 2: Run the Query Store configuration command
Open a new query window and run:
ALTER DATABASE [db1]
SET QUERY_STORE (MAX_STORAGE_SIZE_MB = 4000);
This changes the Query Store maximum allocated storage size to 4,000 MB.
Step 3: Verify the setting
Run this query in db1:
SELECT
actual_state_desc,
desired_state_desc,
current_storage_size_mb,
max_storage_size_mb
FROM sys.database_query_store_options;
Expected result:
max_storage_size_mb = 4000
Microsoft documents sys.database_query_store_options as the catalog view that returns Query Store configuration, including max_storage_size_mb.
Method 2 — SSMS Graphical Method
Use this if the simulation expects a GUI action.
Step 1: Connect to the server
Open SQL Server Management Studio.
Connect to the Azure SQL logical server.
Expand Databases.
Right-click db1.
Select Properties.
Step 2: Open Query Store settings
In the Database Properties window, select Query Store.
Find the setting:
Max Size (MB)
or:
Maximum Storage Size (MB)
Change the value to:
4000
Select OK.
Step 3: Verify
Run:
SELECT max_storage_size_mb
FROM sys.database_query_store_options;
Expected value:
4000
Azure Portal Clarification
The Azure portal is not the best tool for this specific Query Store configuration. Query Store size is a database engine setting, not a normal Azure resource setting like backup retention, locks, alerts, or private endpoints.
Use SSMS/T-SQL for this task.
Important Notes
Query Store must remain enabled
Do not disable Query Store. Azure SQL Database uses Query Store heavily, and Microsoft notes that Query Store is enabled by default for Azure SQL Database. The task only asks to increase the maximum storage size, not to change capture mode, cleanup policy, or operation mode.
4,000 MB is valid
Azure SQL Database allows Query Store MAX_STORAGE_SIZE_MB up to 10,240 MB, so this setting is within the allowed range.
Final Exam-Lab Action
Run this against db1:
ALTER DATABASE [db1]
SET QUERY_STORE (MAX_STORAGE_SIZE_MB = 4000);
Then verify with:
SELECT max_storage_size_mb
FROM sys.database_query_store_options;
The task is complete when the result shows:
4000
Task 11
You have a legacy application written for Microsoft SQL Server 2012. The application will be the only application that accesses db1 You need to ensure that db1 is compatible with all the features and syntax of SQL Server 2012.
See the explanation part for the complete Solution.
To ensure that db1 is compatible with all the features and syntax of SQL Server 2012, you need to set the compatibility level of the database to 110, which is the compatibility level for SQL Server 20121. The compatibility level affects the behavior of certain Transact-SQL statements and features, and determines how the database engine interprets the SQL code2.
You can set the compatibility level of db1 by using the Azure portal or Transact-SQL statements. Here are the steps for both methods:
Using the Azure portal:
Go to the Azure portal and select your Azure SQL Database server that hosts db1.
Select the database db1 and click on Query Performance Insight in the left menu.
Click on Configure Query Store and select 110 from the Compatibility level dropdown list.
Click on Save to apply the change.
Using Transact-SQL statements:
Connect to db1 using SQL Server Management Studio, Azure Data Studio, or any other tool that supports Transact-SQL statements.
Open a new query window and run the following command: ALTER DATABASE db1 SET COMPATIBILITY_LEVEL = 110; GO
This command will set the compatibility level of db1 to 110, which is equivalent to SQL Server 2012.
These are the steps to set the compatibility level of db1 to 110.
Task 4
You need to enable change data capture (CDC) for db1.
See the explanation part for the complete Solution.
To enable change data capture (CDC) for db1, you need to run the stored procedure sys.sp_cdc_enable_db in the database context. CDC is a feature that records activity on a database when tables and rows have been modified1. CDC can be used for various scenarios, such as data synchronization, auditing, or ETL processes2.
Here are the steps to enable CDC for db1:
Connect to db1 using SQL Server Management Studio, Azure Data Studio, or any other tool that supports Transact-SQL statements.
Open a new query window and run the following command: EXEC sys.sp_cdc_enable_db; GO
This command will enable CDC for the database and create the cdc schema, cdc user, metadata tables, and other system objects for the database3.
To verify that CDC is enabled for db1, you can query the is_cdc_enabled column in the sys.databases catalog view. The value should be 1 for db1.
These are the steps to enable CDC for db1
Task 5
You need to configure a disaster recovery solution for db1. When a failover occurs, the connection strings to the database must remain the same. The secondary server must be in the West US 3 Azure region.
See the explanation part for the complete Solution.
To configure a disaster recovery solution for db1, you can use the failover groups feature of Azure SQL Database. Failover groups allow you to manage the replication and failover of a group of databases across different regions with the same connection strings1. You can also use active geo-replication as an alternative, but you will need to update the connection strings manually after a failover2.
Here are the steps to create a failover group for db1 with the secondary server in the West US 3 region:
Using the Azure portal:
Go to the Azure portal and select your Azure SQL Database server that hosts db1.
Select Failover groups in the left menu and click on Add group.
Enter a name for the failover group and select West US 3 as the secondary region.
Click on Create a new server and enter the details for the secondary server, such as server name, admin login, password, and subscription.
Click on Select existing database(s) and choose db1 from the list of databases on the primary server.
Click on Configure failover policy and select the failover mode, grace period, and read-write failover endpoint mode according to your preferences.
Click on Create to create the failover group and start the replication of db1 to the secondary server.
Using PowerShell commands:
Install the Azure PowerShell module and log in with your Azure account.
Run the following command to create a new server in the West US 3 region: New-AzSqlServer -ResourceGroupName < your-resource-group-name > -ServerName < your-secondary-server-name > -Location " West US 3 " -SqlAdministratorCredentials $(New-Object -TypeName System.Management.Automation.PSCredential -ArgumentList " < your-admin-login > " , $(ConvertTo-SecureString -String " < your-password > " -AsPlainText -Force))
Run the following command to create a new failover group with db1: New-AzSqlDatabaseFailoverGroup -ResourceGroupName < your-resource-group-name > -ServerName < your-primary-server-name > -PartnerResourceGroupName < your-resource-group-name > -PartnerServerName < your-secondary-server-name > -FailoverGroupName < your-failover-group-name > -Database db1 -FailoverPolicy Manual -GracePeriodWithDataLossHours 1 -ReadWriteFailoverEndpoint " Enabled "
You can modify the parameters of the command according to your preferences, such as the failover policy, grace period, and read-write failover endpoint mode.
These are the steps to create a failover group for db1 with the secondary server in the West US 3 region.
Task 2
You need to configure your user account as the Azure AD admin for the server named sql3700689S.
See the explanation part for the complete Solution.
To configure your user account as the Azure AD admin for the server named sql3700689S, you can use the Azure portal or the Azure CLI. Here are the steps for both methods:
Using the Azure portal:
Go to the Azure portal and select SQL Server – Azure Arc.
Select the server named sql3700689S and click on Active Directory admin.
Click on Set admin and choose your user account from the list of Azure AD users.
Click on Select and then Save to confirm the change.
You can verify the Azure AD admin by clicking on Active Directory admin again and checking the current admin.
Using the Azure CLI:
Install the Azure CLI and log in with your Azure account.
Run the following command to get the object ID of your user account: az ad user show --id < your-user-name > --query objectId -o tsv
Run the following command to set your user account as the Azure AD admin for the server: az sql server ad-admin create --server sql3700689S --object-id < your-object-id > --display-name < your-user-name >
You can verify the Azure AD admin by running the following command: az sql server ad-admin show --server sql3700689S
These are the steps to configure your user account as the Azure AD admin for the server named sql3700689S.
Task 10
You need to protect all the databases on sql37006S95 from SQL injection attacks.
See the explanation part for the complete Solution.
SQL injection attacks are a type of cyberattack that exploit a vulnerability in the application code that interacts with the database. An attacker can inject malicious SQL statements into the user input, such as a form field or a URL parameter, and execute them on the database server, resulting in data theft, corruption, or unauthorized access1.
To protect all the databases on sql37006S95 from SQL injection attacks, you need to follow some best practices for securing your application and database layers. Here are some of the recommended steps:
Use parameterized queries or stored procedures to separate the SQL code from the user input. This will prevent the user input from being interpreted as part of the SQL statement and avoid SQL injection23.
Validate and sanitize the user input before passing it to the database. This will ensure that the input conforms to the expected format and type, and remove any potentially harmful characters or keywords4.
Implement least privilege access for the database users and roles. This will limit the permissions and actions that the application can perform on the database, and reduce the impact of a successful SQL injection attack5.
Enable Advanced Threat Protection for Azure SQL Database. This is a feature that detects and alerts you of anomalous activities and potential threats on your database, such as SQL injection, brute force attacks, or unusual access patterns. You can configure the alert settings and notifications using the Azure portal or PowerShell.
These are some of the steps to protect all the databases on sql37006S95 from SQL injection attacks.
Task 7
You need to capture the following information for all the databases on sql60l 52867;
• Queries to the databases
• Users that executed the queries
The captured information must be stored in sa60152867.
You may need to use SQL Server Management Studio and the Azure portal.
See the explanation part for the complete Solution.
Enable Azure SQL Auditing at the server level on the Azure SQL logical server:
sql60152867
and configure the audit destination as the Azure Storage account:
sa60152867
This is the correct solution because the task says all databases on sql60152867. Database-level auditing would only apply to one database. Server-level auditing applies to all existing and newly created databases on the logical server. Microsoft states that server auditing policies apply to all existing and newly created databases on the server. The default auditing policy includes BATCH_COMPLETED_GROUP, which audits queries and stored procedures executed against the database, plus successful and failed authentication events.
Azure Portal Method — Recommended for Simulation
Step 1: Open the Azure SQL logical server
Sign in to the Azure portal.
Search for:
SQL servers
Open the SQL logical server named:
sql60152867
Be careful with the name. In your prompt, it appears as sql60l 52867, but the earlier tasks strongly indicate the real server name is probably:
sql60152867
Use the SQL logical server that hosts the databases, not a single SQL database.
Step 2: Open Auditing
On the SQL server page:
In the left menu, go to Security.
Select Auditing.
Microsoft’s setup path is to navigate to Auditing under the Security heading in either the SQL database or SQL server pane. For this task, you must use the SQL server pane because the requirement covers all databases.
Step 3: Enable server-level auditing
Set:
Enable Azure SQL Auditing = On
or:
Auditing = On
depending on the portal wording.
This enables the server-level audit policy.
Step 4: Select Storage as the audit destination
Under Audit log destination, select:
Storage
Then choose the storage account:
sa60152867
Microsoft states that Azure SQL auditing can write database events to an Azure storage account, Log Analytics workspace, or Event Hubs. For this simulation, the destination must be the storage account sa60152867, so do not choose Log Analytics or Event Hub unless the task separately asks for them.
Step 5: Configure storage authentication
If the portal asks for authentication type, use one of these depending on what is available in the lab:
Option
Use when
Managed Identity
Preferred if available
Storage access keys
Use if the lab expects the older/default storage-key method
Microsoft recommends managed identity for storage authentication because storage access keys are a security risk. However, many exam simulations still accept the default storage-key flow as long as the audit destination is correctly set to the required storage account.
Step 6: Leave default audit action groups enabled
Do not remove the default audit action groups.
The default Azure SQL auditing policy includes:
BATCH_COMPLETED_GROUP
SUCCESSFUL_DATABASE_AUTHENTICATION_GROUP
FAILED_DATABASE_AUTHENTICATION_GROUP
BATCH_COMPLETED_GROUP is the key one here because it captures completed T-SQL batches, meaning the queries executed against the databases. Authentication and principal fields identify the login/user context. Microsoft states that the default auditing policy audits all queries and stored procedures executed against the database, plus successful and failed logins.
Step 7: Save the auditing configuration
Select:
Save
Wait for the portal notification that the auditing settings were saved successfully.
That completes the required configuration.
Verification
Verify from the Azure portal
Open the SQL server:
sql60152867
Go to:
Security > Auditing
Confirm:
Auditing: On
Destination: Storage
Storage account: sa60152867
Scope: Server-level
Verify storage output
After users execute queries, audit files should appear in the storage account.
Open storage account:
sa60152867
Go to Containers.
Open:
sqldbauditlogs
Azure SQL audit logs written to Azure Storage are stored in a container named sqldbauditlogs. Audit logs are written as .xel files and can be opened with SQL Server Management Studio.
What Information Is Captured?
The audit log includes the exact fields needed for this task.
Required information
Audit log field
Query executed
statement / statement_s
Database name
database_name / database_name_s
User context
database_principal_name / database_principal_name_s
Login context
server_principal_name / server_principal_name_s
Session principal
session_server_principal_name / session_server_principal_name_s
Time of execution
event_time / event_time_t
Client IP
client_ip / client_ip_s
Microsoft’s audit log format documents statement as the T-SQL statement that was executed, database_principal_name as the database user context, and server_principal_name as the current login.
SSMS Method — Viewing the Audit Logs
SSMS is not the main tool to enable Azure SQL auditing in this simulation, but it can be used to read the .xel audit files after they are written.
Step 1: Download or access the .xel files
From the storage account:
sa60152867 > Containers > sqldbauditlogs
Download the .xel audit file, or access it through supported tooling.
Step 2: Open the audit file in SSMS
Open SQL Server Management Studio.
Go to:
File > Open > File
Select the .xel audit file.
Review fields such as:
statement
database_principal_name
server_principal_name
database_name
event_time
client_ip
This verifies that the queries and the users that executed them are being captured.
Azure CLI Method
Use this only if Cloud Shell is available and you know the resource group names.
az sql server audit-policy update \
--resource-group < resource-group-name > \
--name sql60152867 \
--state Enabled \
--storage-account sa60152867
Depending on the environment, you may also need to specify the storage endpoint and access key, or use managed identity configuration. In the portal simulation, the UI normally handles this for you.
PowerShell Method
Use this if Azure PowerShell is available.
Set-AzSqlServerAudit `
-ResourceGroupName " < resource-group-name > " `
-ServerName " sql60152867 " `
-BlobStorageTargetState Enabled `
-StorageAccountResourceId " /subscriptions/ < subscription-id > /resourceGroups/ < storage-rg > /providers/Microsoft.Storage/storageAccounts/sa60152867 "
This configures auditing at the server level, which is the correct scope for all databases.
Final Exam-Lab Action
Configure this in the Azure portal:
SQL server: sql60152867
Security > Auditing
Auditing: On
Audit destination: Storage
Storage account: sa60152867
Default audit action groups: Enabled
Save
That captures queries and the users who executed them for all databases on the SQL logical server and stores the audit records in sa60152867.
Task 4
You need to encrypt the LastName column of the SalesLT.Customer table in db1 by using Always Encrypted. You must use the Windows Certificate Store. You may need to use SQL Server Management Studio and the Azure portal.
See the explanation part for the complete Solution.
Use SQL Server Management Studio Always Encrypted Wizard and encrypt:
Database: db1
Schema: SalesLT
Table: Customer
Column: LastName
Encryption feature: Always Encrypted
Column master key store: Windows Certificate Store
Do not use Transparent Data Encryption. TDE encrypts the database at rest, but this task specifically requires Always Encrypted, which protects selected columns and keeps the encryption keys outside the database engine. Microsoft states that Always Encrypted uses column encryption keys to encrypt column data and column master keys to protect those column encryption keys. Column master keys are stored outside the database system, such as in the Windows certificate store.
Method 1 — SSMS Always Encrypted Wizard
This is the correct method for the simulation.
Step 1: Open SSMS and connect to Azure SQL Database
Open SQL Server Management Studio.
Connect to the Azure SQL logical server that hosts db1.
Use a SQL admin account or Microsoft Entra admin account.
In Options > Connection Properties, select database:
db1
Connect.
If SSMS cannot connect, go to the Azure portal and add your client IP address under the SQL server firewall/networking settings.
Step 2: Open the table column
In Object Explorer:
Expand Databases.
Expand db1.
Expand Tables.
Expand:
SalesLT.Customer
Expand Columns.
Locate:
LastName
Microsoft confirms that the Always Encrypted Wizard can be launched at the database, table, or individual column level. For one column, the cleanest path is to launch it directly from the column.
Step 3: Launch the Always Encrypted Wizard
Right-click the LastName column, then select:
Encrypt Column
or, depending on the SSMS version:
Always Encrypted Wizard
Alternative path:
Right-click db1 > Tasks > Always Encrypted Wizard
Then manually select:
SalesLT.Customer.LastName
Step 4: Select the LastName column for encryption
On the Column Selection page:
Find:
SalesLT.Customer.LastName
Select the checkbox for LastName.
Set the encryption type.
Use:
Randomized
unless the lab specifically requires searching or equality filtering on LastName.
Reason: Randomized encryption is stronger because identical plaintext values produce different ciphertext values. Deterministic encryption allows equality lookups, joins, grouping, and indexing, but leaks more pattern information because identical plaintext values produce identical encrypted values. Microsoft describes deterministic encryption as query-friendly but more pattern-revealing, while randomized encryption is more secure but does not support normal searching/grouping/joining without secure enclaves.
For this task, the requirement is only to encrypt the LastName column, so Randomized is the safer default.
Step 5: Choose or create a Column Encryption Key
For Encryption Key, select a new key such as:
CEK_Auto1
or create a new column encryption key if one does not already exist.
This is the key that encrypts the data in the LastName column. Microsoft states that a column encryption key encrypts the data in encrypted columns, and the column master key encrypts/protects the column encryption key.
Select Next.
Step 6: Configure the Column Master Key in Windows Certificate Store
On the key configuration page, create a new Column Master Key.
Use settings like:
Setting
Value
Column master key name
CMK_WindowsCert or default generated name
Key store
Windows Certificate Store
Certificate location
Current User
Certificate
Generate new certificate
Column encryption key
CEK_Auto1 or default generated CEK
In many SSMS versions, the wizard creates both:
CMK_Auto1
CEK_Auto1
That is acceptable as long as the CMK key store is Windows Certificate Store.
Microsoft states that SQL Server Management Studio supports column master keys stored in the Windows Certificate Store, and that a column master key can be a certificate stored in Windows Certificate Store.
Step 7: Run the wizard
On the final wizard pages:
Review the configuration.
Choose:
Proceed to finish now
or:
Run immediately
Select Finish.
SSMS will generate the column master key metadata, column encryption key metadata, and perform the data encryption operation. Microsoft explains that the wizard can encrypt selected columns and can generate a new column master key and column encryption key when needed.
During encryption, SSMS may temporarily create a new table, copy data, encrypt the selected column, and swap the table back, depending on whether secure enclaves are used. Microsoft notes that the wizard can move data out of the database and perform cryptographic operations inside the SSMS process when secure enclave in-place encryption is not used.
Verification Steps
Step 1: Confirm Always Encrypted metadata exists
Run this in db1:
SELECT
name,
key_store_provider_name,
key_path
FROM sys.column_master_keys;
You should see a column master key that uses the Windows certificate store provider.
Then run:
SELECT
name
FROM sys.column_encryption_keys;
You should see the column encryption key created by the wizard.
Step 2: Confirm LastName is encrypted
Run:
SELECT
t.name AS table_name,
c.name AS column_name,
c.encryption_type_desc,
cek.name AS column_encryption_key
FROM sys.columns AS c
JOIN sys.tables AS t
ON c.object_id = t.object_id
LEFT JOIN sys.column_encryption_keys AS cek
ON c.column_encryption_key_id = cek.column_encryption_key_id
WHERE t.name = ' Customer '
AND SCHEMA_NAME(t.schema_id) = ' SalesLT '
AND c.name = ' LastName ' ;
Expected result:
table_name: Customer
column_name: LastName
encryption_type_desc: RANDOMIZED
column_encryption_key: CEK_Auto1 or similar
If you selected deterministic encryption, the expected value will be:
DETERMINISTIC
The key requirement is that encryption_type_desc is no longer NULL.
Step 3: Test viewing the encrypted column
Open a new SSMS query connection without Always Encrypted enabled and run:
SELECT TOP 10 LastName
FROM SalesLT.Customer;
You should not see normal plaintext values.
Then reconnect with Always Encrypted enabled:
In SSMS, select Connect > Database Engine.
Select Options.
Go to Additional Connection Parameters.
Add:
Column Encryption Setting=Enabled
Connect again.
Run:
SELECT TOP 10 LastName
FROM SalesLT.Customer;
A client that has access to the Windows certificate/private key should be able to decrypt the values. Microsoft explains that the database stores encrypted data and key metadata, while client-side components with access to the column master key perform encryption and decryption.
Important Exam Notes
Do not choose Azure Key Vault
The task explicitly says:
You must use the Windows Certificate Store.
So the column master key should not be stored in Azure Key Vault.
Wrong:
Azure Key Vault
Correct:
Windows Certificate Store
Do not use TDE
TDE is not column-level Always Encrypted. It encrypts database files/logs at rest, but users and administrators querying the database still see plaintext if they have SQL permissions.
Correct technology:
Always Encrypted
Correct key store:
Windows Certificate Store
Correct target column:
SalesLT.Customer.LastName
Task 9
You need to generate an email alert to admin@contoso.com when CPU percentage utilization for db1 is higher than average.
See the explanation part for the complete Solution.
To generate an email alert to admin@contoso.com when CPU percentage utilization for db1 is higher than average, you can use the Azure portal to create an alert rule based on the CPU percentage metric. Here are the steps to do that:
Go to the Azure portal and select your Azure SQL Database server that hosts db1.
Select Alerts in the Monitoring section and click on New alert rule.
In the Condition section, click Add and select the CPU percentage metric.
In the Configure signal logic page, set the threshold type to Dynamic. This will compare the current metric value to the historical average and trigger the alert when it deviates significantly1.
Set the operator to Greater than, the aggregation type to Average, the aggregation granularity to 1 minute, and the frequency of evaluation to 5 minutes.
Click Done to save the condition.
In the Action group section, click Create and enter a name and a short name for the action group.
In the Notifications section, click Add and select Email/SMS message/Push/Voice.
Enter admin@contoso.com in the Email field and click OK.
Click OK to save the action group.
In the Alert rule details section, enter a name and a description for the alert rule, choose a severity level, and make sure the rule is enabled.
Click Create alert rule to create the alert rule.
This alert rule will send an email to admin@contoso.com when the CPU percentage utilization for db1 is higher than average. You can also add other actions to the alert rule, such as calling a webhook or running an automation script
Task 2
You need to configure differential backups for the db1 Azure SQL database to be once a day instead of twice day. You may need to use SQL Server Management Studio and the Azure portal.

See the explanation part for the complete Solution.
Requirement: Configure differential backups for Azure SQL Database db1 to run once a day instead of twice a day.
Correct setting: Change Differential backup frequency from 12 Hours to 24 Hours.
Azure SQL Database supports differential backup frequency of either 12 hours or 24 hours. A 12-hour frequency means twice per day; a 24-hour frequency means once per day. Microsoft also notes that 24-hour differential backup frequency can increase restore time compared with 12-hour frequency.
Method 1 — Azure Portal Method
This is the best method for the simulation.
Step 1: Open the Azure SQL logical server
Sign in to the Azure portal.
Search for SQL servers.
Open the logical SQL server that hosts database db1.
Do not start from SQL Server Management Studio for this task. The differential backup frequency is an Azure SQL backup policy setting, not a normal T-SQL database setting.
Step 2: Open the Backups page
In the SQL server left menu, select Backups.
Select the Retention policies tab.
Microsoft’s documented portal path is to go to the logical SQL server, select Backups, then select the Retention policies tab.
Step 3: Select database db1
In the list of databases, locate db1.
Select the checkbox next to db1.
Select Configure policies from the action bar.
Step 4: Change the differential backup frequency
In the policy configuration pane:
Find Differential backup frequency.
Change it from:
12 Hours
to:
24 Hours
Leave the PITR retention period unchanged unless the task specifically tells you to change it.
Select Apply or Save.
Microsoft’s documented option is exactly 12 Hours or 24 hours under Differential backup frequency.
Method 2 — Azure CLI Method
Use this if the simulation provides Cloud Shell.
az sql db str-policy set \
--resource-group < resource-group-name > \
--server < server-name > \
--name db1 \
--retention-days < current-retention-days > \
--diffbackup-hours 24
Example:
az sql db str-policy set \
--resource-group RG1 \
--server sql60152867 \
--name db1 \
--retention-days 7 \
--diffbackup-hours 24
Microsoft documents az sql db str-policy set with --diffbackup-hours 24 for changing active database differential backup frequency. Valid values are 12 or 24 hours.
Be careful: do not guess the retention days blindly in a real environment. In the exam lab, use the existing retention value shown in the portal unless the task also asks you to change retention.
Method 3 — PowerShell Method
Use this if Azure PowerShell is available.
Set-AzSqlDatabaseBackupShortTermRetentionPolicy `
-ResourceGroupName " < resource-group-name > " `
-ServerName " < server-name > " `
-DatabaseName " db1 " `
-RetentionDays < current-retention-days > `
-DiffBackupIntervalInHours 24
Microsoft documents Set-AzSqlDatabaseBackupShortTermRetentionPolicy with -DiffBackupIntervalInHours 24 for setting Azure SQL Database differential backup frequency.
SSMS / T-SQL Clarification
For this task, SSMS is not the right tool to change the setting.
There is no normal ALTER DATABASE T-SQL command in Azure SQL Database to change automated differential backup frequency. Microsoft documents this change through:
Azure portal
Azure CLI
PowerShell
REST API
not SSMS/T-SQL.
You may use SSMS only to confirm the database exists and is accessible, but the backup frequency setting must be changed from Azure management tools.
TESTED 15 Jul 2026