After configuring domain security policies, what task must you run to ensure the most recent changes go into effect?
Refer to the following scenario to answer the question below.
You need to configure a Core Connector: Candidate Outbound integration for your vendor. The connector requires the data initialization service (DIS).
The vendor needs the file to only include candidates that undergo a candidate assessment event in Workday.
How do you accomplish this?
Refer to the following scenario to answer the question below.
You have configured a Core Connector: Worker integration, which utilizes the following basic configuration:
• Integration field attributes are configured to output the Position Title and Business Title fields from the Position Data section.
• Integration Population Eligibility uses the field Is Manager which returns true if the worker holds a manager role.
• Transaction Log service has been configured to Subscribe to specific Transaction Types: Position Edit Event.
You launch your integration with the following date launch parameters (Date format of MM/DD/YYYY):
• As of Entry Moment: 05/25/2024 12:00:00 AM
• Effective Date: 05/25/2024
• Last Successful As of Entry Moment: 05/23/2024 12:00:00 AM
• Last Successful Effective Date: 05/23/2024
To test your integration, you made a change to a worker named Jeff Gordon who is not assigned to the manager role. You perform an Edit Position on Jeff Gordon and update their business title to a new value. Jeff Gordon ' s worker history shows the Edit Position Event as being successfully completed with an effective date of 05/24/2024 and an Entry Moment of 05/24/2024 07:58:53 AM however Jeff Gordon does not show up in your output.
What configuration element would have to be modified for the integration to include Jeff Gordon in the output?
Refer to the following scenario to answer the question below.
You are configuring a Core Connector: Worker integration to send data to a new external compliance and certification tracking vendor. You have begun to configure the connector with the Data Initialization Service (DIS) enabled. Your goal is to extract worker qualification data, but the vendor has three specific requirements:
The file must only include Active workers who are in the “Clinical Staff” Job Family.
The vendor has specified that for each worker’s Education data, they only want to receive the Institution Name, Institution Type and Degree.
The vendor requires a custom “License ID” that must combine the Certification Name and Issuing State, for example, “RN-CA”. A Calculated Field that provides this custom “License ID” already exists in the tenant.
During testing, using a Full File run, the output file is missing all education-related information, even though you believe you have initially configured field attributes such as Institution Name, Institution Type and Degree in the Configure Integration Field Attributes step. Additionally, you confirmed that the Worker Qualification Data Section is marked as Include in Output.
What should you do to resolve this issue?
A calculated field used as a field override in a Connector is not appearing in the output. Assuming the field has a value, what could cause this to occur?
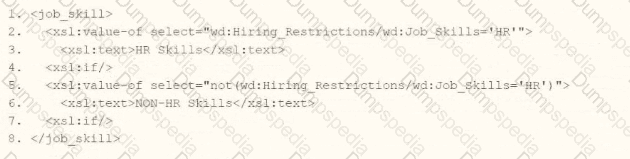
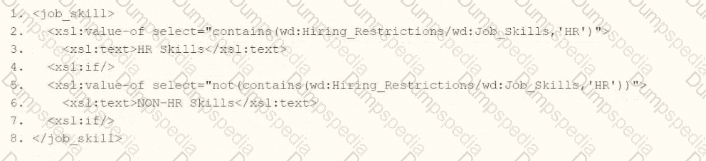
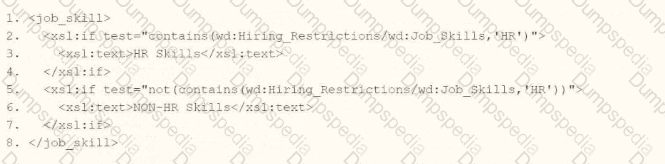
The following XML code was generated through a RaaS that will be used in an EIB.
You want to use predicated templates that will process USA workers one way, GBR workers another way, and all other countries a standard way.
What XML code will create these templates?
Refer to the following XML to answer the question below.
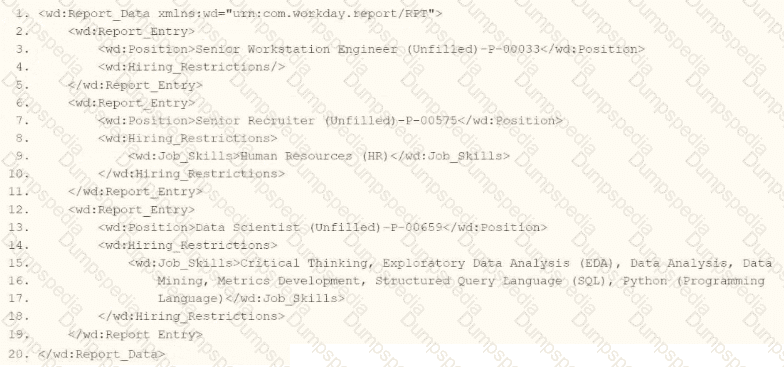
You are an integration developer and need to write X8LT to transform the output of an ElB which is using a web service enabled report to output position data along with hiring restrictions around skills. You currently have a template which matches on wd:Report Data/wd: Report .Entry for creating a record from each report entry.
Within the template which matches on wd:Report_Entry you would like to conditionally process the wd:Job_Skills element by using a series of < xsl:if > elements so as to categorize the job skills data.
Assuming all jobs will have the wd:Job_Skills element, what XSLT syntax would be used to output the text HR Skills if the value of wd:Job_Skills contains the text HR and output NON-HR Skills if the value of wd:Job_Skills does not contain the text HR?

You are configuring a monthly schedule for an EIB integration that runs on the last day of each month.
What is the maximum end date you can use in this configuration?
Refer to the following scenario to answer the question below.
You are configuring a filename sequence generator for a connector. Below are common pattern tokens for timestamps ranging from the year to the millisecond.
Define the sequence format using a combination of string constants and pattern tokens to create a unique identifier. Note the example tokens include the square brackets.
For the next sequence number: [Seq] or [seq]
Assume date of September 21, 2022, 12:35:59:123 PM. Some common tokens:
Year: [yyyy] = 2022, [yy] = 22
Month: [MMM] = Sep, [MM] = 09, [M] = 9
Day: [d] = 21, [E] = Wed, [D] = 265
Hours: [k] = 13, [h] = 1
Minutes: [m] = 35
Seconds: [s] = 59
Milliseconds: [S] = 123
What pattern will generate the hour minute second timestamp format of “4:35:15”?
You are developing a Core Connector: Worker integration with DIS enabled. You configure the Population Eligibility to include all US workers and also define the Eligibility Criterion field to return only those workers assigned to the Sales organization.
When you run the integration, the output includes all US workers instead of just those in Sales.
What should you do to ensure only workers in the Sales organization appear in the output?
You need to create a report that includes data from multiple business objects. For a supervisory organization specified at run time, the report must output one row per worker, their active benefit plans, and the names and ages of all related dependents. The Worker business object contains the Employee, Benefit Plans, and Dependents fields. The Dependent business object contains the employee ' s dependent ' s Name and Age fields.
How would you select the primary business object (PBO) and related business objects (RBO) for the report?
Refer to the following scenario to answer the question below.
You need to configure a Core Connector: Candidate Outbound integration for your vendor. The connector requires the data initialization service (DIS).
The vendor requests additional formatting of the candidate Country field. For example, if a candidate ' s country is the United States of America, the output should show USA.
What steps do you follow to meet this request?
An external system needs a file containing data for recent compensation changes. They would like to receive a file routinely at 5 PM eastern standard time, excluding weekends. The file should show compensation changes since the last integration run.
What is the recurrence type of the integration schedule?
How do you initially upload the XSLT file to a Document Transformation integration system?
After you transfer ownership of an Integration System to an ISU, what other component, if it exists, must you transfer ownership of to ensure the integration continues to run in an automated fashion?
Refer to the following scenario to answer the question below.
You have been asked to build an integration using the Core Connector: Worker template and should leverage the Data Initialization Service (DIS). The integration will be used to export a full file (no change detection) for employees only and will include personal data.
What configuration is required to output the value of a calculated field which you created for inclusion in this integration?
Refer to the following scenario to answer the question below.
You have been asked to build an integration using the Core Connector: Worker template and should leverage the Data Initialization Service (DIS). The integration will be used to export a full file (no change detection) for employees only and will include personal data.
What configuration is required to ensure that when outputting phone number only the home phone number is included in the output?
You are configuring a Core Connector integration that will send data to an external vendor. The vendor requires that the integration output file includes a unique Batch ID in its filename.
This ID must follow the format VNDR_YEARMONTH_seq.xml, where YEAR is the four-digit year, MONTH is the two-digit month, and seq is a five-digit sequence number that must reset to 00001 at the beginning of each new month.
Which settings must you configure on the integration Filename Sequence Generator to produce this Batch ID filename?
Refer to the scenario. You are configuring a Core Connector: Worker integration to extract worker demographic and contact information. The integration uses the Data Initialization Service (DIS) and must include worker fields such as name, address, and a calculated field identifying workers eligible for a phone allowance.
During a Full File test run, the output file is missing all address-related information, even though the Address Line Data, Municipality, Region, and Postal Code fields were configured in the Configure Integration Field Attributes step. You also confirmed that the Worker Personal Data Section is marked as Include in Output.
What should you do to resolve this issue?
You have been asked to create an integration using the Core Connector: Worker with DIS template. The vendor has requested that you only include employees who are based in the San Francisco area that are on leave.
How do you configure your integration so that only workers who meet the requirements are included in the output file?
A vendor needs to create a Date Difference calculated field. However, the two dates needed for that calculation are on two separate business objects.
What additional calculated field do you need to create that Date Difference calculated field?
How does an XSLT processor identify the specific nodes in an XML document to which a particular transformation rule should be applied?
Refer to the following XML to answer the question below.

You are an integration developer and need to write XSLT to transform the output of an EIB which is using a web service enabled report to output worker data along with their dependents. You currently have a template which matches on wd:Report_Data/wd:Report_Entry for creating a record from each report entry.
Within the template which matches on wd:Report_Entry you would like to conditionally process the wd:Dependents_Group elements by using an < xsl:apply-templates > element.
What XPath syntax would be used as the select for the apply templates so as to iterate over only the wd:Dependents_Group elements where the dependent relationship is Child?
Refer to the scenario. You are configuring a Core Connector: Worker integration with the Data Initialization Service (DIS) enabled, scheduled to run once daily. The integration must extract only active worker records with changes to compensation, home address, or business title since the last 24 hours. It uses Workday’s change detection to avoid full extracts.
During testing, the Core Connector: Worker DIS output unexpectedly includes terminated workers, even though the change detection date parameters are correctly defined for a Full-Diff extract. The requirements specify that only active workers should be included in the output.
What configuration step should you modify to ensure the integration excludes terminated workers?
You have an existing EIB that you configured with a filename sequence generator that is associated with the EIB in the Deliver section. However, after testing the EIB, you notice that the filename is not using the configured sequence generator.
What is causing the sequence generator to not be used?
You are building an outbound EIB integration that uses a custom report to send worker data to a new Active Directory system. You must create a calculated field for the User ID, which the report will output. The User ID must follow the company’s new standard format: the first three letters of the worker’s first name, followed by the first three letters of their last name, with the entire string in lowercase.
Example: A worker named “Logan McNeil” must have a User ID of “logmcn”.
Which combination of calculated fields should you use?
You need to filter a custom report to only show workers that have been terminated after a user-prompted date.
How do you combine conditions in the filter to meet this requirement?

TESTED 16 Jul 2026